The Hip joint consists of a ball and socket where the top of the thigh meets the pelvis. To be more specific it’s where the femur bone sinks into the Acetabulum socket.
The hips have a huge job to do offering stability for the upper torso and also providing locomotion.
The hips sacrifice mobility for stability unlike the shoulder joint.
Movement is vital for the health of the hips because the act of movement helps:
- Regenerate fresh cartilage
- Suck the nourishing synovial fluid through the joint
- Maintain good end ranges of movement
Ironically it is the lack of movement of the hip joint following disease or injury that leads to their demise. With a limited blood supply to the joint it is the act of movement that produces a pumping effect bringing fresh blood in and flushing it away.
In order to maintain a healthy hip joint the joint needs to be exercised to its full range in all directions. Walking is an excellent exercise to pump nutrients into the hip joints but its limited range is not enough.
If hip joint movements are limited to only activities like walking and sitting then the hip capsules range begins to reduce.
As hip movement gets limited the body begins to compensate in order to maintain optimal performance. The first area that usually gets affected is the lower back.
In short, if the hips can’t produce the desired movements then the lower back will.
Although the lower back (lumbar spine) is designed for slight movement it is not designed to produce compensations for the hips and this is where the problems begin.
So for healthy hips keep moving but also work the joint through its full range to save your lower back.
Here are a collection of effective hip mobility movements for you to practice:
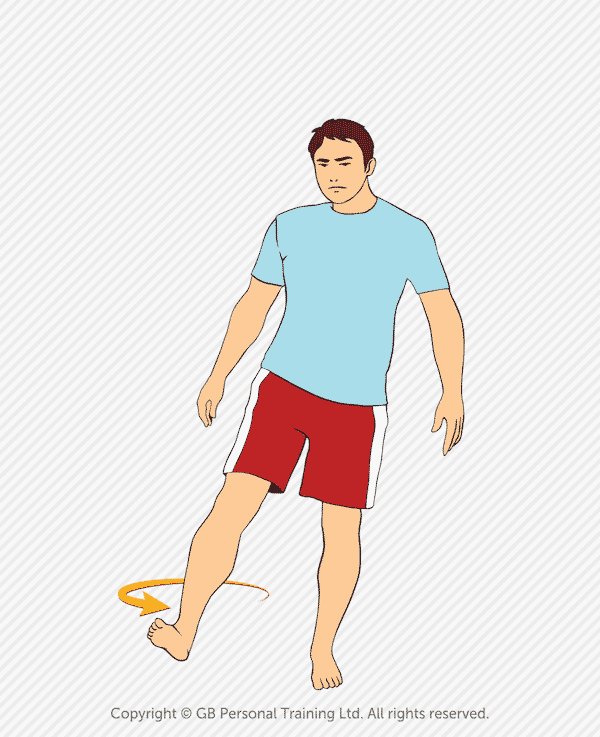
# 1 – Forward Leg Swings

This is a really simple movement that you can practice virtually anywhere.
Stand on one leg, hold onto something if you need help with your balance, and then swing the leg backwards and forwards.
It is the backwards swing that is the most important as this range of movement is the first to go.
Avoid arching your back as you swing the leg backwards and try to keep as straight a leg as possible.
If you stand on a small step, box or platform you will find it even easier to swing your leg through without touching the floor.
# 2 – Side Leg Swings

Very similar to the forward leg swings only this time your swing the leg across the body in front of you.
Try to maintain a forward pointing toe position as you swing left and right.
So lead with the heel as you swing across the body.
Again you can hold onto something for balance but it is a great challenge to try without.
If you get the hands moving in the opposite direction it will help.
You will also notice that the ankle on the floor also gets mobilized during each leg swing.
# 3 – Circular Leg Swings
The final one of the leg swing section and this movement takes the joint through a full 360 degrees.
Again standing on one leg rotate the other leg around in circles by the side of your static leg.
You can start with small circles and then build up to larger and larger circles.
If you can perform this exercise without hold on to anything you will also develop stabilizing strength in your standing hip.
Try 60 seconds of circles without putting your foot down and you will see what I mean.
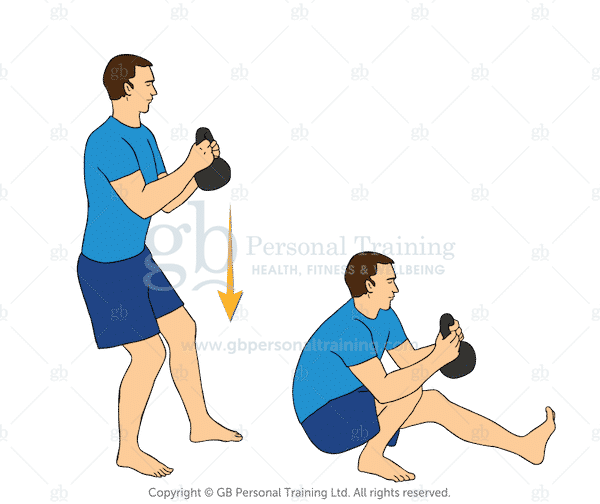
# 4 – Yoga Squats

Probably one of my favourite mobility exercises because it not only helps mobilize the hips but also most of the other joints too!
Start off with hands above your head and drop down into a deep squat, keeping your weight on your heels.
If you find it hard to get down nice and deep then turn your feet out slightly and widen your legs.
Once down place your hands down and straighten your legs.
Next sit back down into the deep squat and stand again.
Start performing 10 Yoga Squats every morning and it will change your life!
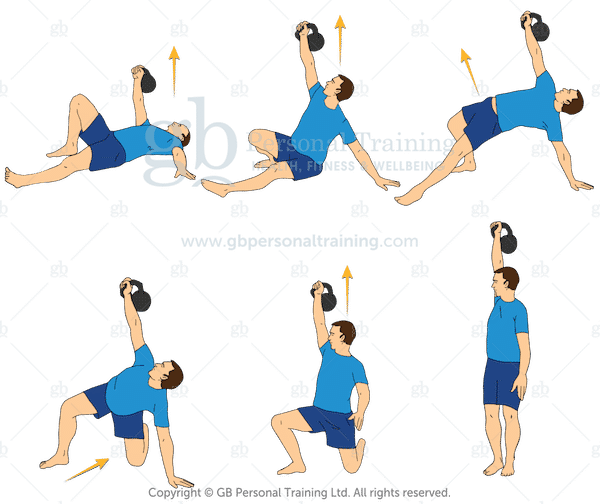
# 5 – High Step Lunge
This movement not only opens the hips of the one leg but also encourages hip extension with the other.
Remember hip extension is the first range to go so it’s a great movement to practice.
Start facing a chair or high step. Place one foot up onto the chair and carefully kneel down on the floor with the other leg.
Next push your hips forwards and the crown of your head upwards.
Squeeze the buttock of the leg kneeling on the floor.
Try not to arch your back, the movement must come from the hips not the lower back.
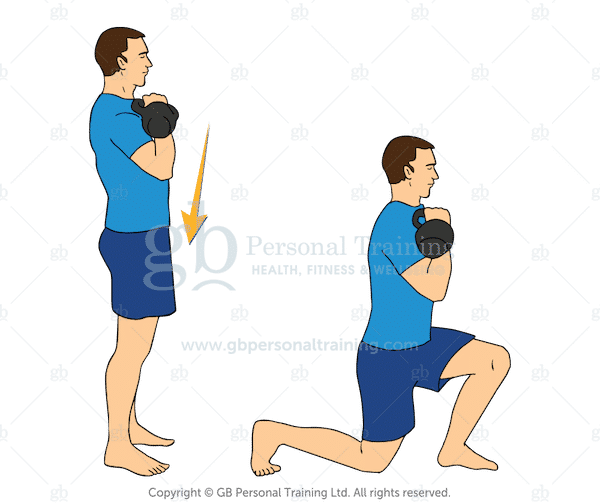
# 6 – Deep Lunge
Wow this movement will certainly give your hips a new lease of life.
Starting from a Push Up position take one foot and place it to the outside of your hand.
Next breathe out and sink your hips to the floor.
Hold for 5 seconds and return to the starting position. Repeat on the other side.
The more flexible your hips become the further forward you can place your foot.
# 7 – Cossack

Not just a great dance move but also an excellent hip mobility exercise.
Start with your feet double shoulder width apart with your toes pointing outwards.
Hold onto a chair, table or stability ball in front of you if necessary.
Next drop into a deep lunge on the one side keeping your heels on the floor and keeping the one leg straight.
Hold at the bottom for a few seconds and then repeat on the other side.
# 8 – The Frog
Taking a stretch from the ballet world ‘The Frog’ will really help to open up those hips but it is an aggressive stretch so be careful.
Start on your hands and knees making sure you have a mat or soft surface beneath you.
Next slowly spread your knees apart keeping your feet together.
Take your time, the more mobile your hips the deeper you will be able to drop into the movement.
Certainly not recommended for the beginner but a great stretch for when you are ready.
# 9 – Baby Pose
One of my favourite hip mobility exercises for beginners and excellent for those suffering with lower back pain.
Lie on your back with your feet in the air.
Next reach up and grab the outside of the feet, you can also just grab the knees.
Gently pull one knee towards the armpit followed by the other.
You can work on rhythmical patterns here alternating legs or pulling both at the same time.
As your mobility improves sink your knees deeper and deeper into your armpits.
# 10 – Pigeon Lunge
A slightly more advanced exercise that will help open up a tough hip capsule.
Start in the Push Up position and then take one leg across and underneath your body.
Lay the leg flat so your knee is pointing forwards and underneath your chest.
Next slowly lower yourself onto the knee and support yourself on your forearms.
Take deep breaths and let your hips sink down towards the floor.
For an even more intense stretch reach out your arms in front of you and lay forwards.
# 11 – Figure Four
The Piriformis muscle can literally be a pain in the arse.
This movement not only helps to stretch the Piriformis muscle but also the very strong Gluteal muscles that effect the positioning of the femur in its socket.
Start by lying down on your back with your knees bent and both feet touching a wall.
Next cross one leg over so the ankle rests just above the knee.
Apply gentle pressure to the knee to feel the stretch in your buttock.
The more your legs are bent and you’re closer to the wall the stronger the stretch.
# 12 – Dynamic Hip and Thoracic Spine

This is an all encompassing movement that not only opens up your hips but also strengthens the core and opens up the often locked up Thoracic Spine.
Follow the same movement as the #6 Deep Lunge but once the foot has been placed next to the hand take the arm closest to the instep of the forward leg and place the forearm on the floor.
Next take the same arm and reach up and rotate the chest, opening the upper back.
Hold for a few seconds and the repeat, 5 on each side is a good start.
# 13 – Step Overs
A nice easy movement to practice but one that is often performed badly.
From a standing position take the knee out to the side and lift the foot. Next rotate forwards and place the foot down in front of you.
Repeat on the other side.
You should actively be moving forwards looking like you are stepping over something.
Try to lift the foot as high as possible but don’t compensate with the lower back.
Stand tall and focus on movement solely coming from the hips.
Final Conclusion
As with all exercises please start off slowly and progress gradually.
Being able to breathe calmly and deeply is a good sign that you can handle the movement.
Practice these movements little and often for maximum results!
Have you tried any of these exercises? Let me know more below: