• Skip to primary navigation
  • Skip to main content
  • Skip to primary sidebar

GB Personal Training Ltd

Health, Fitness & Wellbeing

  • Workouts
  • About
  • Blog

7 Popular Exercises You Must Avoid and Safer Alternatives

By Greg Brookes

7 popular exercises you must avoid

The human body is an incredible piece of engineering. It’s capable of such amazing movements.

But just because the body can perform a certain movement does not mean it is good for us.

There seems to be an epidemic at the moment of people in gyms and parks on a mission to totally destroy their body.

Here are 7 of the most common exercises that I see that need to be reconsidered:


# 1 – Dips

Dips have been around for years.

They even have specialised dips bars in gyms purely designed for performing sets of dips.

Dips however are not shoulder friendly unless performed with excessive forward lean.

As you lower yourself down, under full bodyweight, during the Dip exercise you put your shoulder capsule under huge amounts of strain.

The arms are not designed to go backwards to that extreme.

You can see this for yourself just by standing tall and then seeing how far you can take the arms backwards.

The worse types of Dips are the ones that you see during boot camps that are performed off a park bench.

Ever wondered why your shoulders are sore after performing Dips?

It’s because you are stretching all your ligaments and the soft tissue of the shoulder joint.

If you don’t want sloppy and unstable shoulder joints that are more likely to dislocate then lay off the Dips.

Safer Alternative: Regular Push Ups or Narrow Push Ups

Push Up Exercise is a safer alternative


# 2 – Behind the Head Lat Pull Downs

Everybody seems to have tried or performed this exercise at one time or another.

Almost every gym has a Lat Pull Down machine which consist of a T-Bar on a cable suspended from overhead.

Pulling the bar down to the upper chest does not present too much of a problem but when the bar is pulled down behind the head then it becomes very dangerous for the shoulder joint.

During the, behind the head, movement the shoulder joint is placed under external rotation and then with force taken well below its natural range.

You will even see people lean their head forwards as a natural reaction to the exercise so the shoulder isn’t put under so much strain.

Those with hypermobile shoulders will find this exercise much easier but it still compromises the integrity of the shoulder capsule.

Safer Alternative: Pull Downs to the Upper Chest or even better Chin Ups


# 3 – Sit Ups or Crunches

This is an exercise that is always painful to watch.

After spending a day hunched over a computer or desk the posture is made even worse by Crunching forward even more.

Surely after sitting in such a terrible position all day you would want to train the opposite muscles to pull everything backwards again!

Crunches and Sit Ups also only perform 50% of the natural movement of the spine if you are performing them lying on the floor.

If you are going to perform this exercise then at least Crunch over a Stability Ball to get the full range of movement.

Not only do Sit Ups and Crunches seem counter intuitive to posture but they also don’t seem to line up with our natural daily movements.

How often do you Crunch forwards in daily life?

Working on Core Stabilisation is a much more functional direction to take.

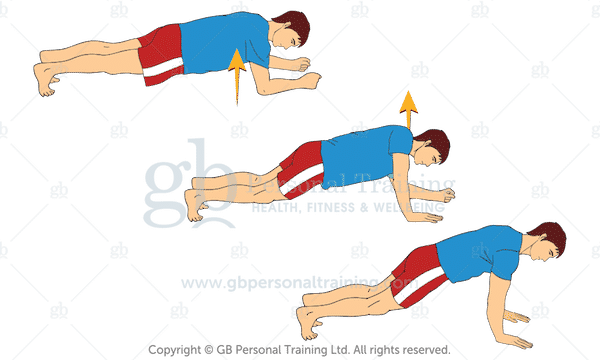
Safer Alternative: Planks, Woodchops, Stability Ball Jack Knife

Plank to Push Up Exercise


# 4 – Running When You’re Not Strong Enough

Before you get too excited and all the running clubs start sending me hate mail hear me out.

Running puts a massive strain on the body.

Over 3 times the bodyweight goes through each leg during every stride.

In order to absorb this kind of shock the body must have good alignment and core strength.

The Core stabilises the pelvis to provide a solid platform for the legs to operate under.

Sadly most people have very weak core muscles due to inactivity and due to excess sitting most people also have bad joint alignment and stabilisation from head to toe.

Now take your average overweight runner looking to lose weight and then add in all these factors and the result is usually injury within 4 weeks.

If you want to start running, which I’m not against, then losing excess weight through diet and bodyweight exercises to improve core strength and joint stability would be a safer starting point.

Safter Alternative: Bodyweight Circuits, Fast Mountain Climbers or Hill Walking Intervals

Fast Mountain Climbers for Cardio


# 5 – Deep Bench Press

The bench press will offer you a great way to add some serious muscle and strength to the chest and triceps but you have to be careful.

When loading the barbell or dumbbells you must be very careful not to take the bar down too low.

Touching the bar to the chest, or even bouncing it, is usually too deep for the shoulder capsules to handle.

There is a simple test you can try to see how deep you should take the bar.

Lie on the bench and use a wooden dowel or broomstick and see how deep you can naturally go.

Most people find they cannot go as deep as the chest, it is only the added weight of the bar that forces the shoulders into this position.

The same theory applies to performing dumbbell presses and dumbbell fly’s, just ensure you only go as deep as your shoulders will allow and not how deep the weight dictates.

Safer Alternative: Test your natural range and stick within it or use push ups instead


# 6 – Hamstring Curls

You have probably seen this crazy exercise where you lay on your belly on a machine and then pull your heels to your buttocks.

If you are into body building and not human movement I can see how this isolates the Hamstrings muscles.

But beware, lying down in this position puts huge strain on both the knee joints and the lower back.

Using a machine like this puts the body in a totally unnatural position and forces the joints to work in isolation, as opposed to an integrated unit the way the body is design to operate.

Isolation exercises like this one also force the body to move through a dedicated pattern which in nature is something that the body will avoid to prevent overuse injuries.

Finally think about the movement, how often do you perform this movement in nature?

Safer Alternative: Deadlifts or Single Leg Deadlifts

Kettlebell Single Leg Deadlift


# 7 – Smith Machine Squats

The Squat is one of our fundamental movement patterns and I would always recommend that people learn to squat correctly.

Every time you sit down and stand up, or get into your car you are performing a variation of the squat.

Not only is the squat highly practical but it also offers huge benefits to the body including activating most muscles, pumping bodily fluids, opening up the lower back and increasing testosterone production.

The Smith machine is a bar that is held on runners that goes up and down along the same path vertically.

Many people think it is safe to perform a squat using a smith machine because it does have fail safe measures in case you drop or slip under the bar.

However, the smith machines vertical path does not mimic the natural path that we would take when performing a regular squat.

During the regular squat the upper body leans forwards off the vertical line to counterbalance balance the backwards movement of the hips.

The smith machine not only compromises the movement but also encourages bad form of this crucial exercise.

Add in the fact that it is very difficult to drop down deep enough to engage the buttocks correctly and you have a very weird and unnatural movement.

Safer Alternative: Kettlebell Goblet Squats or Barbell Front Squats

Kettlebell Goblet Squat Exercise


Conclusions

With so many safer exercises available there is no need to be performing movements that will cause you injury.

Think smart and start performing natural movements that will help to improve your health and movement skills and not degrade them.


Have you tried any of these safer exercises? Let me know more below:

Top 5 Kettlebell Exercises for Interval Training or HIIT

By Greg Brookes

top 5 kettlebell exercises for interval training

This post has been inspired by the following email I received today:

“I’ve been experimenting with HIIT for a while now but only doing sprints. My garage is my home gym. It consists of kettlebells 12kg, 16, 20 & 24kg bells (only singles of each weight) and a pull up bar.

I have all your kettlebell apps and train with kettlebells usually 5 times a week. I note your suggestion of Using 32, 24 & 20kg bells for swing intervals. I’d love to try it but don’t have bells that heavy at the moment.

Are there any other kettlebell exercises you’d recommend for HIIT? I’m guessing the snatch would work well? I’m keen to make best use of my pull up bar if you can suggest a use for that with HIIT?”

OK, so here are my suggestions for Kettlebell Interval Training:


Top 5 Kettlebell Exercises for HIIT

# 1 – Kettlebell Swings

Two Handed Kettlebell Swing Exercise

No kettlebell workout would be complete without some kettlebell swings.

The Kettlebell Swing works the entire body and makes up the cornerstone of all kettlebell training.

Here are 3 HIIT kettlebell swing workouts:

  1. Push Ups x 10
  2. Swings x 20
  3. Repeat reducing the Push Ups by 1 each round
  • Swings x 30 seconds
  • Pull Ups x 1 (you asked for them 🙂
  • Repeat adding 1 pull up each round. See how high you can go
  1. Start 60 second timer
  2. Swing x 30
  3. Rest remainder of minute the repeat for 10 minutes

Want more? See the Complete Guide to the Kettlebell Swing here


# 2 – Kettlebell High Pulls

Kettlebell High Pull Exercise

A monster of an exercise and even more cardiovascular that the kettlebell swings.

I like them because kettlebells can often neglect pulling movements so this one is a gem.

Here’s 3 workouts:

  1. High Pulls Left – 30 secs
  2. High Pulls Right – 30 secs
  3. Rest 30 secs repeat 3 – 8 rounds
  • Swing Left 30 secs, High Pull Left 30 secs
  • Repeat other side
  • Rest 30 secs, repeat 3 – 8 rounds
  1. High Pulls Right x 5
  2. High Pulls Left x 5
  3. Continue adding 5 reps until you can’t take any more

Want more? See how to master the high pull exercise here


# 3 – Kettlebell Snatch

Kettlebell Snatch Exercise

The mightly Snatch works every muscle in the body.

Once you have mastered the Swing and High Pull then it’s the natural progression.

Try these 3 workouts:

  1. Snatch x 10 each side
  2. Repeat for 10 minutes
  3. Goal 200+ reps
  • Snatch x 10 reps each side
  • Burpee x 20 reps
  • Rest 30 seconds, repeat 3 – 8 rounds
  1. Snatch x 10 reps each side
  2. High Pulls x 10 reps each side
  3. Swings x 10 reps each side
  4. Repeat for 9 reps, then 8 etc.
  5. See how quick you can finish

Want more? See the Complete Guide to the Kettlebell Snatch here


# 4 – Kettlebell Clean

Kettlebell Clean Exercise

Too many people underestimate the simple clean.

If you want to add in the Press then that is fine but for cardio just work quickly with the clean.

Here are 3 more workouts:

  1. Clean Left x 60 seconds (go as heavy as you can)
  2. Clean Right x 60 seconds (go as heavy as you can)
  3. Rest 60 seconds, repeat 3 – 8 rounds
  • Clean & Squat Left x 60 seconds (go as heavy as you can)
  • Clean & Squat Right x 60 seconds (go as heavy as you can)
  • Rest 60 seconds, repeat 3 – 8 rounds
  1. Swing Right x 10, Clean right x 10
  2. Swing Right x 10, Clean right x 10
  3. Countdown reducing by 1 rep each round

Want more? See How to Master the Kettlebell Clean here


# 5 – Kettlebell Squat and Press

Kettlebell Thruster Exercise

The thruster or Squat and Press certainly gets the heart rate up.

Again working most muscles in the body it’s highly demanding.

Here are 3 workouts:

  1. Squat & Press Left x 10
  2. Squat & Press Right x 10
  3. Pull Ups x 5
  4. Rest 60 secs and repeat 3 – 8 rounds
  • Clean, Squat and Press Left x 10
  • Clean, Squat and Press Right x 10
  • Countdown, reduce by 1 each round
  1. Squat & Press Left x 20, 15, 10, 5
  2. Squat & Press Right x 20, 15, 10, 5
  3. Start at 20 and reduce by 5 each round

Want more? See 7 Squat Variations you Need to Know


Keeping it Simple

As with all HIIT training you need to keep it simple.

Interval Training is not a time for changing exercises too often, things need to stay simple so you can push hard.

Choose a weight that is heavy enough for you to handle and work at a good pace.

Breathe well, push hard and enjoy yourself 🙂


Love kettlebell training? See my Kettlebell Workouts website here

Your Complete Guide to Warming Up Before Exercise

By Greg Brookes

Complete Guide to Warming Up Before You Start to Exercise

Warming up prior to your workout is an essential part of any exercise routine and should never be avoided.

During this article I’ll be exploring the warm up routine and helping you understand exactly what warm up exercises you should be using and why they are so important.

Why Should You Warm Up Before Exercise?

Warming up prepares the body for the oncoming workout and reduces the risk of injury as well as optimising your performance.

Here are some of the reasons why warming up is so vital:

  1. Improve joint lubrication through the production of synovial fluid
  2. Increase your mental preparation for the task ahead, get in the zone and correct mindset for your workout
  3. Integrate the muscular stabliser system with the prime mover system so you are better able to perform full body movements more efficiently
  4. Warm up the soft tissue so your muscles are more pliable, move more efficiently and less likely to cause damage
  5. Increase blood flow through muscle tissue and thus increasing metabolism and temperature
  6. Elevate the heart rate so beginning exercise creates less of an initial stress to the body
  7. Increase muscle temperatures because oxygen is released more easily when warmer
  8. Improve motor unit recruitment of particular movement patterns suitable for the prescribed workout
  9. Integrate left and right brain hemispheres to improve movement skills

It would be a common mistake to go straight from sitting down all day to throwing around weights or putting your body through a demanding workout.


When Should You Warm Up?

You should always warm up just before your workout.

Once you have finished your warm up you should move straight onto your workout.

If you wait too long before starting your workout then your body and mind have time to cool down and you will have to repeat your warm up routine again.

Leave no longer than 30 seconds to 2 minutes between your warm up routine and your workout.

Never skip your warm up regardless of the amount of time you have.


What Should You Include in Your Warm Up?

1. Joint Mobility

The further you can move your joints through their active range of movement the more mobile you are.

As we age we loose mobility through the joints and become less and less mobile.

Good mobility truly is the fountain of youth!

A good mobility routine will not only help to lubricate the joints with synovial fluid but it will also help to maintain a good level of joint mobility.

The stiffer the joints become the more laboured the movements become.

It takes a lot more energy to move a stiff joint through its range than a mobile joint through its range.

You will improve your economy of movement by increasing your mobility.

Your mobility also has a direct impact on the way your body moves as an integrated unit.

If you have tight hips then your lower back will need to become more mobile in order to move fluidly.

If you have tight ankles then your knees will need to compensate in order to deal with uneven ground.

Most of the injuries I see and rehabilitate come from a lack of mobility somewhere along the kinetic chain!

Joint mobility should be approached systemically from head to toe spending more time on stiff joints and less time on mobile joints.

The Shoulder Corkscrew is an excellent  joint mobility exercise:

Shoulder Corkscrew Warm Up


2. Integration

Prepare the body for exercise by Integrating your body.

Your body consists of small stabiliser muscles that keep your joints in place and larger prime mover muscles that do all the heavy lifting.

The easiest way to integrate your stabiliser muscles with your prime mover muscles is to challenge your balance.

As your balance gets challenged your nervous system works overtime and survival systems get turned on.

Ever noticed how alert you are when challenged with a survival situation.

Another important part of integration is activating your right and left brain hemispheres.

Your right brain communicates with the left side of the body and the left brain with the right side.

Simple ways to integrate the 2 brain hemispheres are to perform cross body movements that cross the centre line.

Here’s an example exercise that crosses the mid-line:

Cross Body Core Exercises


3. Movement Preparation

Movement preparation involves practicing specific movements that mimic the movements that you will be using in your workout.

Jogging on a treadmill or sitting on an exercise bike for 5 minutes have no direction correlation with a workout that is focusing on Squats or Deadlifts.

If your workout is focused on Squats then you need to perform some bodyweight squats or light squats prior to your workout.

In other words practice the movement patterns that will be used in your workouts.

Movement preparation based exercises not only copy the exact movement patterns in preparation for the workout but they also give you time to improve them.

So if your squat pattern is bad then now is the time to really work on improving technique before adding further load.

The Yoga Squat is an excellent Squat Movement preparation exercise:

Bodyweight Yoga Squats


4. Soft Tissue

It is very important to keep all of your soft tissue in good condition.

Muscles, tendons and ligaments that have micro-tears, adhesions and scar tissue needs to be addressed and assisted in the recovery process.

You can use a foam roller, tiger tails, tennis ball and various other tools to improve soft tissue quality.

I used to spend more time before workouts addressing soft tissue but now I tend to NOT include this procedure as part of the warm up.

I now reserve soft tissue recovery for days when not exercising.

Finding a good sports massage therapist and having them address your issues every 1-4 weeks can make a huge difference to both your recovery rate and frequency of injury.


How to Warm Up Effectively?

Step # 1 – Joint Mobility

OK, so lets get started with the warm up.

You will want to begin with the Joint Mobility phase. I recommend that you start at the top of the body and work your way down.

So you can follow this order:

  • Neck (Cervical Spine)
  • Shoulders
  • Upper Back (Thoracic Spine)
  • Hips
  • Wrists and Ankles

Think about how the joint moves and then replicate that movement.

So we know that the Neck moves left and right, forwards and backwards, and side to side.

Take the joint as far as it will go without causing pain.

Remember you are trying to improve your mobility so move right up to the extreme of your joint movement and not just your mid range.

If a particular joint feels tight or lacks movement then spend more time on that area.

Gradually push the joint further and further to its extreme range.

If a particular joint has great mobility then don’t spend too much time there move onto the next movement.

Here’s a Quick Full Body Mobility Routine…

 
This routine is a great supplement for anyone that suffers with their joint mobility.

Perform the routine as many times as you can manage, it’s especially good for days off between workouts.

I guarantee you’ll feel amazing after you have finished!


Step # 2 – Integration

OK, now your joints are nice and mobile lets move onto the Integration Phase.

As mentioned earlier the best way to do this is by challenging your balance and also performing exercises that cross the centre line.

Integration Exercise # 1 – Standing Elbow to Knee

Stamding Elbow to Knee Core Exercise

Here you not only get to challenge your balance and fire up your nervous system but also integrate your left and right brain hemispheres.

If you find this exercise too easy then try performing the same exercise but standing on a BOSU ball or foam pad.

10 – 20 reps is a Good Start

Integration Exercise # 2 – Bird Dog with Rotation

Bird Dog with Rotation Exercise

This exercise is slightly more difficult than the standing elbow to knee and requires a little more core control.

Again great for left and right integration.

If you find this one too easy try it on a BOSU Ball, Foam Pad or Stability Ball.

5 – 10 on each side will do it.


Step # 3 – Movement Preparation

So finally we are onto Movement Preparation.

This is the phase where you need to think hard about what exercises you are performing in your workout.

Depending on your workout you will mimic the same movement patterns so if you are performing a number of loaded Squats in your workout you will want to practice the Squat movement.

The same theory applies if you are performing lots of Lunges or Deadlifts or Presses.

Here’s a simple Guide:

  • Loaded Squats >> Practice Bodyweight Squats
  • Loaded Lunges >> Practice Bodyweight Lunges Forwards and Sideways
  • Loaded Bench Press >> Practice Light Bench Press and Push Ups
  • Loaded Deadlifts >> Practice Bodweight Single Leg Deadlifts
  • Loaded Rows >> Practice Light Rows

I think you get the general idea.

Basically repeat the movement but with less or no added weight to the movement.

Here the Bodyweight Single Leg Deadlift:

Single Leg Deadlift

You would use this as a movement preparation for further Deadlift exercises.

Try 5 – 10 reps on each leg.

If your workout is going to involve running or sprinting then again you need to replicate the movement pattern.

So some gentle jogging, knee to elbow rotational movements and lunging will prepare you.

Think logically about how your Warm Up applies to YOUR workout. Don’t just follow someone else’s warm up because all workouts are different!


Warming Up Frequently Asked Questions

What if I don’t have much time?

A warm up is an important part of your workout, it is not separate from your workout.

If you are short on time then focus on warming up for a shorter workout.

So perhaps your workout may only involve Squats and some Core exercises.

If this is the case then warm up just for the Squat movement.

For example 20 Bodyweight Squats, 2 x 15 Dumbbell Squats, 3 x 8 Barbell Squats.

What if warming up is too difficult?

For many people following the above format may be hard work.

For example 10 bodyweight squats is a warm up exercise for one person but a workout for another.

If you find bodyweight squats or warm exercises tough then this IS your workout.

Spend time practicing the movements until you feel ready to move on to more difficult exercises later.

What if the warm up makes me feel tired before my workout?

Warm up exercises should leave you invigorated and ready to get stuck into your workout.

If you feel tired following your warm up then you have either done too much, need to work solely on your warm up exercises or need to take another day off and come back refreshed.

How long should I warm up?

Your warm up should be a direct reflection of your workout and current environment.

For tough workouts you should warm up more intensely.

If you are in a warm climate then it will take less time to raise your core and muscle temperature.

As a rough guide 10 – 15 minutes should do the trick.

Should I stretch as a warm up?

Research now shows that stretching prior to exercise can have a serious effect on muscle performance.

Stretching in order to better maximise a movement pattern can be acceptable but it should be monitored by a professional.

Joint mobility movements are far better at the beginning of a workout than the old fashioned static stretch.


Warm Up Conclusions

Hopefully you now understand the importance of warming up before exercise.

Keep it simple and learn to not only listen to your body but also think about what movements will be involved in your workout.

Begin with Joint Mobility, then move onto Integration and finally finish with Movement Preparation.

A simple 10 – 15 minute warm up routine will not only help to maximise your workout but also keep you out of the Physiotherapists clinic for many years to come.


How do you like this Warm Up? Let’s me know more below…


Kettlebell Complex Flow Using Over 600 Muscles

By Greg Brookes

Kettlebell Complex Flow

Today’s workout is for all those Kettlebell Fans out there.

This Kettlebell Complex takes just 4 exercises and puts them together into a nice flow.

The beauty of Kettlebell Training is the ability to take an exercise and then seamlessly move into another exercise without having to put the kettlebell down. Using this flowing style of workout ensures that you keep your heart rate elevated while hitting all the muscles of the body.

The following workout is demanding and very cardiovascular. You could use it as part of your Cardio training program rather than traditional running methods.

Ensure you have a base level of Kettlebell Skill before attempting this Workout.


The Warm Up

Run through the following warm up 2 times. If you find this warm up too difficult then the warm up is your workout and you should not proceed on to the following workout.

All exercises are performed with bodyweight only except the Turkish Get Up.

  • 10 x Yoga Squats
  • 10 x Single Leg Forward Reaches (each leg)
  • 3 x Turkish Get Ups
  • Repeat Once more

The Kettlebell Workout

Complete the following exercises in order, try not to put the Kettlebell down until the whole sequence is finished. Feel the flow!

Finish the exercise on both sides before moving onto the next exercise.

(Click to watch videos of each exercise)

  • Single Arm Swing
  • High Pulls
  • Snatch
  • Clean, Squat & Press
  • Rest for 1 minute and repeat

The Numbers

Start by getting used to the flow of the exercises, don’t worry about times and repetitions at this stage, just practice. When you are comfortable try the following repetitions:

Stage 1

Perform 5 repetitions on each side before moving onto the next exercise. Rest for 1-2 minutes at the end and repeat 1-3 times.

Stage 2

Perform 8 repetitions on each side before moving onto the next exercise. Rest for 1-2 minutes at the end and repeat 2-4 times.

Stage 3

Perform 12 repetitions on each side before moving onto the next exercise. Rest for 1-2 minutes at the end and repeat 2-4 times.

Have fun with this little workout and really get into the flow of the transitions as you move from one exercise to the next.

Quick tip: take a rest at the top of the Snatch if needed!


How Often?

As with all training your recovery will be dependent on your lifestyle, nutrition and occupation. As a guide I would recommend at least 1 days rest between this workout and the next.

If you like this workout then you will enjoy my Kettlebell Workouts website

What Babies Can Teach Us About How We Should Exercise

By Greg Brookes

What Babies Can Teach Us About How to Exercise

Have you ever noticed the postural similarities between a baby and the elderly?

Understanding the development of the human body will help you realise why certain exercises are great for your posture and why others are destroying it.

Later I’ll be showing you what exercises you should focus on but for now lets look at what human development teaches us.

It Starts with Pronation

When a child is born, and even prior to birth, they adopt the fetal position. In anatomical terms this is referred to as being in pronation.

During Pronation the arms and legs are turned inwards and the body is in flexion or bent forwards.

It is also interesting to note that this position is adopted as a defensive position during times of danger, it’s comfortable and protects the vital organs. Shock most people and they will instinctively move into pronation.


Moving into Supination

As time passes the body starts to open out like a flower in spring. The spine begins to straighten and the limbs, through the development of muscle, start to turn outwards. The body moves from Pronation into Supination.

Finally we get to a position, all being well, where the body is fully upright. The spine develops its natural “S Curve” and the strength of our back muscles and Buttocks keeps us upright and open.

Maintaining an upright and Supinated position signals to the world that we are strong, confident and mean business!


Ends Back in Pronation

As we age gravity starts to take its toll. Muscles start to weaken and the body, slowly at first, and quickly towards the end brings us back down towards the fetal position.

Just like a wilting flower the body starts flexing forwards and the limbs begin to travel inwards.

Elderly people in their final years struggle to straighten their limbs and spend most of their time looking at the ground 🙁


How to Prolong Your Healthy Posture

The way you exercise will have a huge impact on how your body looks and reacts.

If you want to maintain your upright posture and stay in Supination rather than moving back into Pronation then you need to take action.

Exercising to improve your posture is not as difficult as you may think. All you need to do is promote more Supination within the body.

Here are the 3 key areas you need to address:

# 1 – Extension

Rather than spending all of your time on Flexion based exercises like Crunches that take you further into the fetal position.

Work on exercises that promote extension like: Back extensions, Cobras, and Sky Divers.

Here’s an example of the Back Extension exercise (note how it counteracts forward flexion)


# 2 – External Rotation

Have you ever seen someone running and flicking their feet outwards at the back?

Take a look next time you are in your local park and you’ll be surprised! When the knees come in and the feet flick out at the back that is usually due to weak external rotation of the hips. In other words, their buttocks are too weak to keep their legs in a straight line. The legs are being pulled into a pronated position.

Question:  What is the biggest problem with feet today, and hence why the orthotic industry is booming? Answer: Pronation of the feet! Strengthen your External Rotation Muscles or Buttocks and the Pronation of the feet will more times than not disappear.

Work harder on exercises like: Bridges and Single Leg Deadlifts

Here’s a Tutorial video of a the Single Leg Deadlift:


# 3 – Supination

Most kinds of pushing exercises will put you into Pronation, or in other words fold everything inwards. Most kinds of pulling exercises will put you into Supination, or open everything outwards.

So hours spent on Push Ups and Bench Press Exercises will only help to promote bad posture, and turn the body inwards.

It’s ironic that most people work on their chest muscles to increase the appearance of their chest when they are actually only turning their posture in on itself and hiding their prized possessions. If you really want to reveal a good chest then work on exercises that lift the chest and open the body out like a beautiful flower.

Work harder on Pulling based exercises like: Rows, Deadlifts or Cable Pulls.

Here’s a video of an Single Leg Dumbbell Row:


Conclusions

We all only have a finite amount of time on this earth. We start off in a Pronated position and end in a Pronated position but how long you remain strong and upright is up to you.

You can either work hard to destroy your posture or you can work hard to improve it. With any luck you will work hard to maintain a beautiful flowing posture well into your twilight years.


  • « Go to Previous Page
  • Page 1
  • Page 2
  • Page 3
  • Page 4
  • Go to Next Page »
GB Personal Training Ltd

-

Greg Brookes is the founder of GB Personal Training Ltd and KettlebellsWorkouts.com. He has been featured in Men's Health, Women's Fitness, Men's Fitness, and Health & Fitness Magazine, where he wrote a monthly column. He has also been featured in the majority of UK national newspapers. Labelled as "the trainer to the trainers" he delivers seminars and a regular newsletter to help Personal Trainers improve their skills and achieve better results for their clients. Continue reading

Top Articles

  • 41 Full Body Medicine Ball Exercises
  • 500 Bodyweight Workout Challenge
  • Complete Guide to Kettlebell Training
  • Why Your Hamstrings are Tight
  • Top 13 Functional Training Exercises
  • 17 Bodyweight Cardio Exercises
  • 13 Hip Mobility Exercises to Ease Lower Back
  • 7 Popular Exercises You Must Avoid
  • How to Perform 100 Push Ups
  • 33 Kettlebell Exercises
  • 12 Exercises to Build Better Buttocks
  • 7 Foods That Have More Calcium Than Milk
  • Top 5 Kettlebell Exercises for Interval Training
  • Your Complete Guide to Warming Up

Kettlebell Programs

Kettlebell Programs
  • Workouts
  • About
  • Blog
Kettlebell Workouts | Kettlebell Exercises | Privacy Policy | Terms| Disclaimer

Copyright © 2025 GB Personal Training Ltd . All rights reserved.