• Skip to primary navigation
  • Skip to main content
  • Skip to primary sidebar

GB Personal Training Ltd

Health, Fitness & Wellbeing

  • Workouts
  • About
  • Blog

22 Scientific Core Exercises Using No Equipment

By Greg Brookes

22 Scientific Core Exercises Using No Equipment

The core muscles are the most important muscles in the body for movement.

Not only do strong core muscles look good but they connect the top half of the body to the bottom half.

A good well functioning core means more power, a well protected spine and a tight midsection.

You don’t need all the latest gadgets and gizmos to exercise your core muscles just some sensible and scientific bodyweight exercises.


# 1 – Bird Dogs

Bird Dog Core Exercise

A fundamental exercise that everyone should include in their workout program at some time.

Start on all fours with knees under hips and hands under shoulders.

Extend opposite arm and opposite leg as far as possible concentrating on lengthening the body.

Next bring the knee and elbow together while contracting the core muscles.

Repeat on the other side.

Breathe in as you lengthen the body.


# 2 – Back Extensions

Back Extensions Core Exercise

The core does not just involve the abdominal muscles it stretches all the way around the body.

This exercise works on your back extensors and helps to improve your posture.

Lie on your belly with the arms stretched out in front.

Take a big breath in as you lift both arms and legs off the floor.

Hold for a few seconds and return back down.

Don’t strain your neck, keep looking down at the floor.
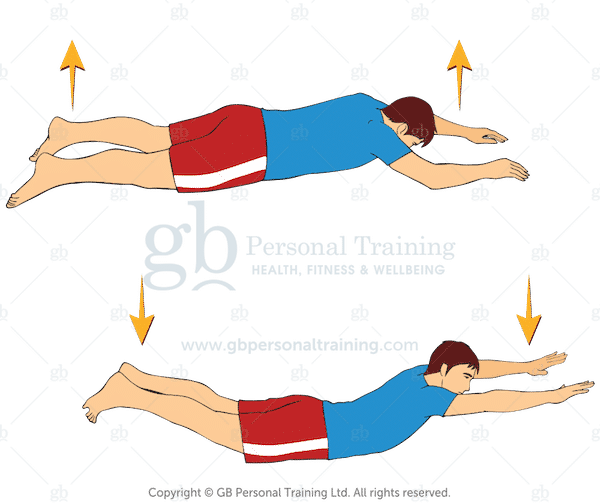

# 3 – Skydivers

Similar to the Back Extension exercise above but with the arms at your sides.

Lift up only the upper part of your body while at the same time rotating the arms outwards to bring the shoulder blades together.

Hold at the top position for up to 30 seconds.

Keep the neck neutral by always looking down and the buttocks squeezed tightly.


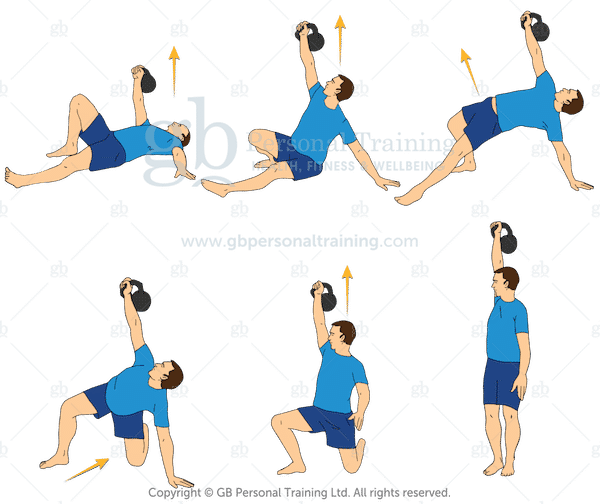
# 4 – Standing Elbow to Knee

Stamding Elbow to Knee Core Exercise

A great core warm up exercise and great for integrating the left and right brain hemispheres.

From a tall standing position raise one knee to the opposite elbow and then repeat on the other side.

The movement should be slow and controlled.

Try 20-30 as a warm up exercise.


# 5 – Front Plank

The exercise that everybody knows.

Prop yourself up on your forearms and toes to activate all those muscles from shoulders to toes.

Ensure that your elbows are directly underneath your armpits or further forward to increase the intensity.

Keep your buttocks tight, back flat and don’t sag at the hips.


# 6 – Front Plank – One Arm, One Leg

Same as the regular front plank but to challenge your core stabilizer muscles further try lifting one leg or one arm.

You can have fun with this exercise by setting a timer to beep every 10 seconds and then rotate around from limb to limb.

So you may start lifting the left leg, then the right leg, then the left arm and finally the right arm.


# 7 – Side Plank

Side Plank Core Exercise

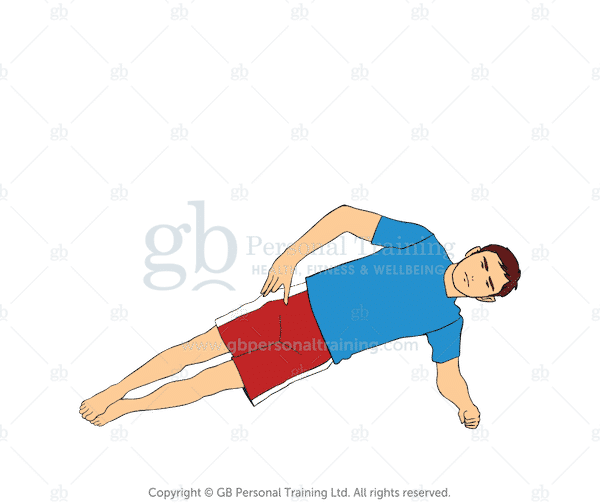
Another of the plank based exercises that targets the lateral core muscles.

The side plank involves holding your body at 90 degrees to the floor propped up on your forearm and side of your foot.

You can either stack the feet on top of each other or place one in front of the other.

Keep the hips high and maintain a good right angle with the floor.

Beginners can start from their knees or even use a wall behind them to maintain good alignment.


# 8 – Side Plank with Knee

Once the side plank has been mastered you can progress to this more challenging exercise.

Start in the regular side plank position with the hips nice and high.

Next bend the top leg and pull the knee to the chest.

Hold at the chest for a second or two and then return to the start position.

Don’t rush it, enjoy it!


# 9 – Side Plank with Extension

Side Plank with Extension Core Exercise

Another Side Plank variation that involves some lateral flexion so you will really feel this one from the hips to the shoulders.

Start in the regular Side Plank position with the hips high.

Next lower the hips to the floor, touch the ground lightly and then push them up as high as possible.

Ensure the hips stay at 90 degree to the floor throughout the exercise.

Keep them slow!


# 10 – Push Up Hold

Similar to the front plank exercise but this time from the hands rather than the forearms.

Basically you hold a Push Up start position keeping the back flat, buttocks tight, arms locked and core braced.

You can balance a pole along the back to check alignment but the hips should never drop.


# 11 – Shoulder Taps

Shoulder Taps Core Exercise

A great progression on from the Push Hold that challenges the core stabilizing muscles even more.

Starting with the static Push Up hold slowly raise one hand and touch the opposite shoulder.

Replace the hand back down and repeat on the other side.

Try to keep the hips square during each tap.

The closer the feet are together the more difficult the exercise.


# 12 – Walk Outs

A simple exercise but very demanding for the core muscles.

Start in the Push Up Hold position and then slowly walk your hands out one inch at a time.

Go as far forwards as you can until you feel your hips are about to drop and then slowly walk back again.

Keep each hand movement to only one inch and move slowly for maximum results.


# 13 – Slow Mountain Climbers

Slow Mountain Climbers Core Exercise

One of my favourite core exercises.

Again from the Push Up Hold position slowly bring one knee to the outside of the elbow, pause for a second and return the leg to the start position.

Next repeat on the other side.

The trick to the exercise is keeping things slow and controlled and ensuring the hips stay as still as possible.


# 14 – Cross Body Mountain Climbers

Cross Body Core Exercises

Similar to the Slow Mountain Climbers only you take the knee across the body to the opposite elbow.

You will really challenge your mobility with this exercise as well as engaging those oblique muscles.

Take your time and ensure you pause when you reach the knee.


# 15 – Up and Down Dog

Taken from the Yoga fraternity this exercise heavily works into the core and back muscles as well as improving mobility.

Start with hands and feet on the floor with hips high, then slowly lower your hips down to the floor using your core to control the movement.

At the bottom your back will be arched as you look up. Slowly push your hips back up to the top and repeat.

Move slow and controlled throughout.


# 16 – Dirty Dogs

Dirty Dogs Core Exercise

Another of my favourites that takes the regular Up and Down Dog exercise to the next level.

Perform the standard Up and Down Dog exercise but when the hips are at the top of the movement take one hand and reach through to touch the opposite toe.

Return the hand back to the floor and then repeat on the other side.


# 17 – Dead Bug

Dead Bug Core Exercise

A great exercise for challenging pelvic stability.

The pelvis is kept in position by your core muscles so the harder the pelvis has to resist movement the harder the core has to work.

Lie on your back with hands and feet in the air.

Maintaining the small of your back on the floor lower your opposite arm and leg to the ground.

Return to the start position and repeat.

If the back cannot maintain constant contact with the ground then the exercise it too difficult.


# 18 – Scissors

Scissors Core Exercise

If you find the Dead Bug too difficult then this is a slightly easier variation.

Lie on your back with feet straight up in the air.

Place your fingertips just underneath your lower back.

Next lower one leg maintaining back pressure on your fingertips.

As soon as you lose that pressure return the foot to the starting position.

Repeat on the other side.


# 19 – Mountain Climber Push Ups

Mountain Climber Push Ups

An advanced version of the Slow Mountain Climber and very challenging for the chest and core muscles.

From the Push Up top position drop down into a regular Push Up but at the same time bring the right knee to the right elbow.

Hold for a second at the bottom and the push back up as you return the leg back to the starting position.

Repeat on the other side.


# 20 – Cross Overs

Cross Overs Core Exercise

Another pelvic stability exercise that really challenges the core muscles.

Lie on your back with just your fingertips in the small of your back.

Raise your feet in the air at 45 degrees and adjust your pelvis so you feel the pressure on your fingers.

Next start slowly crossing one leg over the other.

If you cannot maintain lower back pressure on the tips of your fingers then the exercise is too difficult.


# 21 – Plank to Push Up

Plank to Push Up Core Exercise

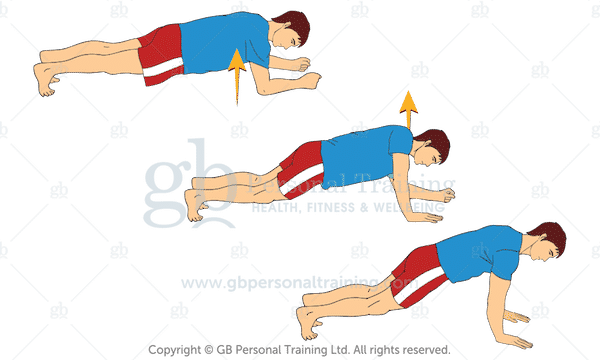
This exercise combines the regular Front Plank with the Push Up Hold.

A great exercise for dynamic stabilization of the core and you will feel it in the shoulders and triceps too!

Start in the top position of a Push Up and then place one forearm down onto the floor and then the other, so you are in the Front Plank.

Next just reverse the movement back to the Push Up position again.

Move slowly and place the arms carefully.


# 22 – Cross Body Extension

Cross Body Extension Core Exercise

A more advanced exercise that will have you trembling to stabilize.

Start in the Push Up hold position and then raise opposite arm and leg as high as possible.

Hold for a few seconds and then repeat on the other side.

Most people find one side weaker than the other, if this is the case practice twice as many on that side.

If you want to train your Core the correct way, from the inside out, then see my:

37 Core & Abs Conditioning Workouts


17 Bodyweight Cardio Exercises Using No Equipment

By Greg Brookes

Bodyweight Cardio Exercises Using No Equipment

If you want to get your heart pumping and increase your lung capacity then cardio based bodyweight exercises are the answer.

The more muscles your can use during an exercise the more demands on energy and the harder the lungs and heart have to work.

The following body weight exercises for cardio require no equipment, they can be performed with your bodyweight only.

Ensure that you have a base level of cardio before performing some of these exercises as the intensity can be very high.

As with all jumping and impact based exercises be careful that you have good joints, ligaments and form before using these exercises.

For maximum results I would recommend an interval style approach to these body weight exercises for cardio so work hard for 20 – 30 seconds and then rest or change exercise.

Here goes…


# 1 – Fast Mountain Climbers

Fast Mountain Climbers

An excellent introduction to bodyweight exercises for cardio.

Tough on the legs as well as the core muscles.

Start in a Push Up position and then alternate jumping one leg forward followed by the other between your hands.

Try to ensure that both feet land at the same time. Work on your timing.

For beginners I will use sliders under the feet to minimalise the impact.


# 2 – Squat Thrust

Squat Thrusts Cardio Exercise

The Squat Thrust takes the Fast Mountain Climber to the next level.

Rather than jumping and alternating legs you keep both legs together.

Ensure you keep both feet together and knees between your elbows as you jump forwards.

As you jump back brace your core muscles and don’t allow your hips to sag.

This bodyweight exercise will challenge your mobility, leg strength, cardio and abs. Again this body weightexercise can be performed with sliders underneath the feet to eliminate the impact for beginners.


# 3 – Jumping Jacks or Star Jumps

Another classic Cardio based bodyweight exercise.

Start in a standing position and jump both feet outwards, at the same time take the arms out sideways too.

Return both feet to the centre and bring the arms down at the same time.

Try to clap your hands together at the top and then at the bottom. Work on your timing!


# 4 – Burpee

Burpee Cardio Exercise

The burpee is very squat heavy exercise so it uses a lot of muscle mass and elevates the heart rate quickly.

From a standing position sit down deep into the squat position and place your hands on the floor.

Next jump both feet back and forwards just like the Squat Thrust.

Finally stand up and push the hips forwards.

Always ensure that you finish standing tall with the buttocks tight.

You can add a jump at the top and push ups at bottom if you wish.


# 5 – Rapid Step Ups

You may remember this one from your school days.

With a bench or step in front of you quickly step up and step down off the bench.

You can overload the one leg by always leading with the same leg or you alternate between sides.

Move as quickly as you can.

You can try 30 seconds of Rapid Step Ups followed by 10 Jump Squats and repeat 3 – 8 times.


# 6 – High Knees

High Knees Cardio Exercise

A powerful bodyweight exercise for cardio that gets the heart rate up fast.

From a standing position sprint on the spot lifting the knees as high as possible.

Use the arms at the same time to really pump the body and get momentum.

You will need to ensure that your calf muscles are nice and warm before performing this exercise.

A great exercise for cardio to partner with the burpee, try 20 seconds of high knees followed by 10 burpees for 3-8 rounds.


# 7 – Buttock Flicks

A simple exercise for cardio that is better for beginners or as a recovery exercise.

From a standing position alternatively flick your legs backward to touch your backside.

If you have tight thighs you will notice a slight stretch during this exercise. A great warm up exercise too!


# 8 – Jump Squats

Jump Squats Cardio Exercise

A serious Plyometric exercise that should only be performed when you can perform perfect regular squats.

Very demanding for the legs and buttocks as well as the heart and lungs.

Perform a regular squat ensuing your thighs go down to at least parallel with the floor.

Next explode from the bottom of the  Squat and into the air.

Try to jump as high as possible pushing the ground away from you.

Land back down with soft knees and immediately drop back into the squat and repeat.


# 9 – Scissor Kicks

A fast bodyweight exercise that may take a little practice.

Start in a standing position and quickly kick one leg out in front of you followed by the other leg.

Continue to bounce from one leg to the other as you kick the legs out in front of you.

One you get into a good rhythm with the movement it works well. Try not to lean back too far.


# 10 – Lump Lunges

Jumping Lunges Cardio Exercise

Slightly more difficult that the Jump Squat and requires more skill and timing.

Perform a regular lunge but as you push up from the ground explode into the air and switch legs so you land with the opposite leg forwards and the other backwards.

Drop straight down into the lunge and repeat.

Always ensure that you drop down into a deep lunge for this exercise for maximum benefits.


# 11 – Tuck Jumps

A very advanced body weight exercise for cardio that will have you breathing heavy in no time.

From a standing position jump up into the air and quickly tuck your knees up to your chest before returning your leg back down ready for landing.

You will need to use your arms for momentum to drive you into the air.

Try performing 10 Tuck Jumps followed by 30 seconds of Fast Mountain Climbers, repeat 3-8 rounds.


# 12 – Side Shuffles

Side Shuffles Cardio Exercise

A great body weight cardio exercise to introduce some sideways or lateral movement into your workout.

From a  standing position shuffle one leg out to the side then quickly replace the leg in the middle with the other leg as you shuffle the other way.

Try to move nice and quickly throughout the exercise and stay on your toes.


# 13 – Skaters with Touch Down

Skaters Cardio Exercise

Very similar in movement to the Side Shuffles except this cardio exercise loads each leg a little more and involves the upper body too.

Shuffle out one leg to the side and then take the other leg behind that leg, at the same time touch the floor with the opposite hand to the side you are moving towards.

Quickly switch sides and repeat in the other direction. When performed correctly you should look like a speed skater, minus the skates of course 🙂


# 14 – Kangaroo

Kangaroos Cardio Exercise

A tough exercise for the legs but worth the effort if you have good movement skills.

Start in a deep squat position with the arms hanging down between the legs and your back straight.

Next explode forwards like a Kangaroo.

Continue to bounce forwards like a Kangaroo gaining as much height between jumps as possible.

It is very important that you keep your chest up and a flat back throughout this exercise.


# 15 – Box Jumps

Great for building leg strength but also for working on your cardio.

Find a solid step or box and practice jumping with both feet up and onto the box.

Use your arms to help drive you up.

Once at the top either jump back down and repeat or step down and repeat.

In order to get the most from this exercise you need to perform the movement quickly and the box needs to be at a challenging height.

Don’t perform this cardio exercise when you are too exhausted or you risk tripping or missing the step or box.


# 16 – Flamingo Burpee

Single Leg Burpee Cardio Exercise

A more advanced body weight cardio exercise that overloads the one leg.

Perform a regular Burpee except this time perform the complete exercise standing only on one leg.

You will need to have good single leg strength for this one as well as strong calf muscles.

If you suffer from calf strains or Achilles Tendon issues then this is not the exercise for you.

Try 10 on one leg and then change sides.


# 17 – Hill Sprints

I couldn’t miss off this excellent exercise and probably one of the best Cardio options.

First perform a good warm up and then sprint for 20 – 30 seconds up a hill.

Next walk back down the hill and repeat. Ensure you have a good cardio base before attempting this exercise and then start with 1-3 Sprints and add 1 extra per week for a maximum of 8 Sprints.

If you can sprint for longer that 30 seconds then you are not running hard enough. Watch your hamstrings and calf muscles during this exercise.

All of these body weight cardio exercises are very demanding so start off slow and build up gradually.


Here are a few body weight workout formats you can try:

Workout 1

  • Exercise 1 – 30 seconds
  • Rest 30 seconds
  • Exercise 2 – 30 seconds
  • Repeat 3 – 8 circuits

Workout 2

  • Exercise 1 – 30 seconds
  • Exercise 2 – 30 seconds
  • Rest 30 seconds and Repeat 3 – 8 times

Workout 3

  • Exercise 1 – 20 reps
  • Exercise 2 – 20 reps
  • Exercise 3 – 20 reps
  • Exercise 4 – 20 reps
  • Repeat for 7 Minutes

Have you tried any of these bodyweight exercises for cardio? Let me know more below:

7 Popular Exercises You Must Avoid and Safer Alternatives

By Greg Brookes

7 popular exercises you must avoid

The human body is an incredible piece of engineering. It’s capable of such amazing movements.

But just because the body can perform a certain movement does not mean it is good for us.

There seems to be an epidemic at the moment of people in gyms and parks on a mission to totally destroy their body.

Here are 7 of the most common exercises that I see that need to be reconsidered:


# 1 – Dips

Dips have been around for years.

They even have specialised dips bars in gyms purely designed for performing sets of dips.

Dips however are not shoulder friendly unless performed with excessive forward lean.

As you lower yourself down, under full bodyweight, during the Dip exercise you put your shoulder capsule under huge amounts of strain.

The arms are not designed to go backwards to that extreme.

You can see this for yourself just by standing tall and then seeing how far you can take the arms backwards.

The worse types of Dips are the ones that you see during boot camps that are performed off a park bench.

Ever wondered why your shoulders are sore after performing Dips?

It’s because you are stretching all your ligaments and the soft tissue of the shoulder joint.

If you don’t want sloppy and unstable shoulder joints that are more likely to dislocate then lay off the Dips.

Safer Alternative: Regular Push Ups or Narrow Push Ups

Push Up Exercise is a safer alternative


# 2 – Behind the Head Lat Pull Downs

Everybody seems to have tried or performed this exercise at one time or another.

Almost every gym has a Lat Pull Down machine which consist of a T-Bar on a cable suspended from overhead.

Pulling the bar down to the upper chest does not present too much of a problem but when the bar is pulled down behind the head then it becomes very dangerous for the shoulder joint.

During the, behind the head, movement the shoulder joint is placed under external rotation and then with force taken well below its natural range.

You will even see people lean their head forwards as a natural reaction to the exercise so the shoulder isn’t put under so much strain.

Those with hypermobile shoulders will find this exercise much easier but it still compromises the integrity of the shoulder capsule.

Safer Alternative: Pull Downs to the Upper Chest or even better Chin Ups


# 3 – Sit Ups or Crunches

This is an exercise that is always painful to watch.

After spending a day hunched over a computer or desk the posture is made even worse by Crunching forward even more.

Surely after sitting in such a terrible position all day you would want to train the opposite muscles to pull everything backwards again!

Crunches and Sit Ups also only perform 50% of the natural movement of the spine if you are performing them lying on the floor.

If you are going to perform this exercise then at least Crunch over a Stability Ball to get the full range of movement.

Not only do Sit Ups and Crunches seem counter intuitive to posture but they also don’t seem to line up with our natural daily movements.

How often do you Crunch forwards in daily life?

Working on Core Stabilisation is a much more functional direction to take.

Safer Alternative: Planks, Woodchops, Stability Ball Jack Knife

Plank to Push Up Exercise


# 4 – Running When You’re Not Strong Enough

Before you get too excited and all the running clubs start sending me hate mail hear me out.

Running puts a massive strain on the body.

Over 3 times the bodyweight goes through each leg during every stride.

In order to absorb this kind of shock the body must have good alignment and core strength.

The Core stabilises the pelvis to provide a solid platform for the legs to operate under.

Sadly most people have very weak core muscles due to inactivity and due to excess sitting most people also have bad joint alignment and stabilisation from head to toe.

Now take your average overweight runner looking to lose weight and then add in all these factors and the result is usually injury within 4 weeks.

If you want to start running, which I’m not against, then losing excess weight through diet and bodyweight exercises to improve core strength and joint stability would be a safer starting point.

Safter Alternative: Bodyweight Circuits, Fast Mountain Climbers or Hill Walking Intervals

Fast Mountain Climbers for Cardio


# 5 – Deep Bench Press

The bench press will offer you a great way to add some serious muscle and strength to the chest and triceps but you have to be careful.

When loading the barbell or dumbbells you must be very careful not to take the bar down too low.

Touching the bar to the chest, or even bouncing it, is usually too deep for the shoulder capsules to handle.

There is a simple test you can try to see how deep you should take the bar.

Lie on the bench and use a wooden dowel or broomstick and see how deep you can naturally go.

Most people find they cannot go as deep as the chest, it is only the added weight of the bar that forces the shoulders into this position.

The same theory applies to performing dumbbell presses and dumbbell fly’s, just ensure you only go as deep as your shoulders will allow and not how deep the weight dictates.

Safer Alternative: Test your natural range and stick within it or use push ups instead


# 6 – Hamstring Curls

You have probably seen this crazy exercise where you lay on your belly on a machine and then pull your heels to your buttocks.

If you are into body building and not human movement I can see how this isolates the Hamstrings muscles.

But beware, lying down in this position puts huge strain on both the knee joints and the lower back.

Using a machine like this puts the body in a totally unnatural position and forces the joints to work in isolation, as opposed to an integrated unit the way the body is design to operate.

Isolation exercises like this one also force the body to move through a dedicated pattern which in nature is something that the body will avoid to prevent overuse injuries.

Finally think about the movement, how often do you perform this movement in nature?

Safer Alternative: Deadlifts or Single Leg Deadlifts

Kettlebell Single Leg Deadlift


# 7 – Smith Machine Squats

The Squat is one of our fundamental movement patterns and I would always recommend that people learn to squat correctly.

Every time you sit down and stand up, or get into your car you are performing a variation of the squat.

Not only is the squat highly practical but it also offers huge benefits to the body including activating most muscles, pumping bodily fluids, opening up the lower back and increasing testosterone production.

The Smith machine is a bar that is held on runners that goes up and down along the same path vertically.

Many people think it is safe to perform a squat using a smith machine because it does have fail safe measures in case you drop or slip under the bar.

However, the smith machines vertical path does not mimic the natural path that we would take when performing a regular squat.

During the regular squat the upper body leans forwards off the vertical line to counterbalance balance the backwards movement of the hips.

The smith machine not only compromises the movement but also encourages bad form of this crucial exercise.

Add in the fact that it is very difficult to drop down deep enough to engage the buttocks correctly and you have a very weird and unnatural movement.

Safer Alternative: Kettlebell Goblet Squats or Barbell Front Squats

Kettlebell Goblet Squat Exercise


Conclusions

With so many safer exercises available there is no need to be performing movements that will cause you injury.

Think smart and start performing natural movements that will help to improve your health and movement skills and not degrade them.


Have you tried any of these safer exercises? Let me know more below:

How to Perform 100 Push Ups: Complete Push Up Guide with Workout Programs

By Greg Brookes

How to Perform 100 Push Ups includes Workout Programs

The Push Up exercise has been around for hundreds of years.

It’s a great conditioning exercise for most muscles of the body and requires no equipment.

In this post I’m going to break down this excellent exercise and show you not only how to perform it effectively but how to design your own push up workouts to get to that magical 100 push ups in one go!

Muscles Involved During the Push Up

The Push Up is a full body exercise that works lots of major muscle groups including:

  • Pectorals – these are your fan shaped chest muscles and are heavily used in all pushing exercises.
  • Triceps – another pushing muscle attached to the back of the arm. The triceps work hard at straightening the arm. So if you don’t fully straighten the arm you won’t get the most out of these muscles.
  • Deltoids – the shoulder muscles play a large role in all pushing exercises but also in the stabilisation of the upper body to maintain alignment during the exercise
  • Serratus Anterior – these muscles on either side of the rib cage attach to the shoulder blade and prevent it from winging during movement. Well developed serratus anterior muscles look like a bunch of bananas just underneath the arm pit. Nice!
  • Abdominals – there is loads of core involvement in the push up. From the Push up position gravity forces the hips to the floor and it’s your core muscles that prevent this from happening. You can think of the Push up as a moving plank exercise from the hands.
  • Glutes – the large buttock muscles are responsible for extending the hip and stabilising the core. When you hold your body in the straight position of a Push up it is your Glutes that are keeping your hips extended and in line.
  • Latisimus Dorsi – these large wing like muscles on the back of the body run from your arm down to your buttocks. Not only do they create internal rotation of the arm but they help with stabilisation all the way down to the buttocks too!
  • Secondary Muscles – there are so many more muscles involved in the push up that also help with correct alignment and stabilisation. The back of the body is actually more involved that you might first imagine.

How to Do the Perfect Push Up

Push Up Exercise

The Push up is so much more than going down and up a few times.

Lets break it down and see how to perform the exercise correctly:

1. Hands

Hand position can vary and as a general rule the closer your hands are together the more Triceps engagement.

The wider the hands the more you use your shoulders.

More on the different types of Push Ups later.

For now lets stick with hands shoulder width apart and directly underneath the shoulders too. Fingertips should be facing forwards.

If you struggle with painful wrists then you can try forming a fist and doing your push ups off your fists.

Use a mat or towels underneath the fists to make this more comfortable.

Another option for sore wrists is to try using Push Up bars that put the hands in a different position that some people find more tolerable.

2. Feet

Keeping the feet together will better engage your core muscles but if you find this a bit too wobbly then separate the feet to a comfortable distance.

You may have seen people performing push ups with one foot on top of the other or raised in the air, these variations produce less stability for the feet and challenge the core muscles and shoulder muscles to stabilise more during the movement.

3. Shoulder Blades

During the push up movement your shoulder blades will want to wing out or stick out backwards. Winging scapular are very common and often down to weak serratus anterior muscles so it is very important that you work hard to keep your back flat during the movement.

As you think about the middle of your back between your shoulder blades you want to actively push this area up and do not allow this section to sag down as you get tired. Ensure you finish the top part of the movement by pushing up through the middle back.

4. Body Alignment

When in the starting position of the Push Up there should be a straight line from head to heel. You can test this position by having a friend lay a broom stick along your back and by following their feedback you can adjust your position accordingly.

Strong activation or bracing through the abdominal muscles and a contraction through the buttocks should bring everything into alignment.

If during the exercise your posture changes and your lower back begins to arch then it’s time to stop. An arching lower back is usually a sign of core weakness and you may be better working on core strengthening exercises first before progressing with the push up.

5. Head

The head and neck alignment should continue the straight line from the heels. A good rule of thumb is to look down just in front of your hands.

Keep the head still throughout the whole movement, you should not be bobbing around during the exercise even as you get tired.

Those ‘piece of junk’ Ab Rollers are often to blame for weak neck muscles during these type of exercises. Remember you are only as strong as your weakest link!

6. Arms

The elbows should not be pushed out during the down and up phase of the exercise. You never push something with your elbows splayed apart so now is not the time to start. Keep your elbows in close to your body for a more favourable shoulder joint angle.

On the downward phase of the Push Up screw your hands into the floor towards the body this will activate your Latisimus Dorsi muscles down the back and side of your body. You should feel the muscles just underneath your armpits activate as you pull yourself down towards the floor.

At the top of the movement you should aim to straighten the arms. Don’t snap the elbow back but ensure that they straighten in order to activate the Triceps muscles at the back of the arms.

7. Speed

You can perform the push up at lots of different speeds but I would recommend a controlled pace of 2 seconds down and 2 seconds up. Do not let your body fall to the floor.

Pull the body down under control. It is during the downward phase that you actually gain more strength so don’t miss out on half the exercise by dropping to the floor.

As you become more advanced at the push up your can lower yourself slowly and push back up more explosively, but to begin with you are better focusing on technique and controlling the movement.

8. Depth

Your goal should be to reach a 90 degree angle at the elbow. If you go much deeper than this you increase the risk of damaging soft tissue and ligaments. Be particularly careful if using push up bars which produce the tendency to go too deep.

If you need a depth guide you can put a rolled up towel underneath the chest and aim to touch it with your sternum every repetition.

9. Breathing

As you descend down into the push up take a deep breath in and as you push up from the floor breath out.

When performing more strength based push up variations like claps and plyo push ups then you may need to hold the breath for a split second just to get maximum core tension.

The reason why you need to hold the breath is because the diaphragm acts as a secondary core stabiliser so it’s not possible to both breathe consistently and perform the exercise at maximum effort.

Here’s a video on how to perform the perfect push up:


What if you Cannot Do 1 Push Up

Many people struggle to perform just 1 perfect push up.

In particular ladies find the push up more difficult due to the lack of strength. No I’m not being sexist here, men naturally have more upper body strength.

If you struggle with the Push Up then you need to regress the movement in order to perform it correctly and avoid getting injured and forming bad habits.

Here’s how to do it:

  1. Wall Push Ups: start by performing push ups with your hands against a wall and feet 3 feet from the wall. When you can perform 20 repetition move onto the next level
  2. Table Push Ups: next perform the push up with your hands on the side of a table. Ensure the table is against a wall so it does not slip. After 20 repetitions move to the next stage
  3. Stool or Chair Push Ups: the final stage is taking the hands even lower onto a chair or stool. Once you can complete 20 repetitions move down onto the floor
  4. Half or Seal Push Ups: you may not need this stage but if so perform the push ups off your knees. Its very important that you maintain a straight line from head to knees even during this version of the push up

Here’s a quick video on how to use stairs to progress your push ups:


Progressing the Number of Push Ups

Once you are performing perfect push ups you can start working on increasing the number of repetitions.

Here’s how to increase the number of push ups by putting them into a 5 set workout.

Initial Assessment

If you want to increase the number of push ups you can perform then you first need to know your starting point.

How many push ups can you do right now without a rest?

Perform as many as you can with perfect form. If your hips start to sag or you push your hips up nice and high to rest then it’s time to stop.

Make a note of this Max Number.

Putting together the Initial Workout

Now you know how many you can perform in one go you need to put together a workout to improve on your maximum. I have found that 5 sets tends to work best for improving on your push ups. You want to perform double the amount of repetitions that you performed during your maximum assessment.

So, this is how you calculate the numbers for your workout:

  1. Multiple your maximum Number by 2
  2. Divide this new number by 5
  3. So if your max was 20: 20 x 2 = 40 / 5 = 8 reps
  4. Perform 5 x 8 reps for a total of 40 reps
  5. Rest 60-90 seconds between each set of 8 reps

This simple formula enables you to put together an initial workout that will help to improve on your Push Ups. However, in order to get stronger you need to progress the number of reps each workout.


6 Week Push Up Workout Plan

So you should have your initial starting numbers as worked out above. Now lets put them into a 6 week workout program so you can get stronger and continue to get results from your workouts.

Workout 3 Times Per Week

I recommend that everyone start with a 3 times per week program. Monday, Wednesday and Friday is a good start. Remember that you actually make gains in strength from your recovery so you need those days rest.

More is not always better in this case. If you find that you are too sore when its time to perform your workout then it’s OK to take another days rest.

Rest Times

To improve your push ups you will need to rest between each set. I have found that 60 – 90 seconds is usually about right.

If you are working on lower numbers then the rest should be longer as this is more of a strength based workout for you.

If you are working at higher numbers then the rest can be shorter as its more endurance focused.

Linear Push Up Program

You will begin with the calculations you made based upon your initial assessment. The following method is simple you just add one extra rep to each set every workout.

So taking the example above, if you performed 20 maximum reps your first 3 workouts will look like this:

Week 1

Mon: Set 1 – 8 reps | Set 2 – 8 reps | Set 3 – 8 reps | Set 4 – 8 reps | Set 5 – 8 reps |40
Wed:Set 1 – 9 reps | Set 2 – 9 reps | Set 3 – 9 reps | Set 4 – 9 reps | Set 5 – 9 reps | 45
Fri: Set 1 – 10 reps | Set 2 – 10 reps | Set 3 – 10 reps | Set 4 – 10 reps | Set 5 – 10 reps | 50

You would continue adding 1 rep per set per workout until week 6 looks like this:

Week 6

Mon: Set 1 – 23 reps | Set 2 – 23 reps | Set 3 – 23 reps | Set 4 – 23 reps | Set 5 – 23 reps | 115
Wed: Set 1 – 24 reps | Set 2 – 24 reps | Set 3 – 24 reps | Set 4 – 24 reps | Set 5 – 24 reps | 120

Fri: Set 1 – 25 reps | Set 2 – 25 reps | Set 3 – 25 reps | Set 4 – 25 reps | Set 5 – 25 reps</strong | 125

So following this method by week 6 you will be performing a total of 125 push ups.

Now retest your maximum.

You will find that your maximum should now be up around the 60 mark after only 6 weeks!

Undulating Push Up Program

I have found the above linear approach very effective but it can be rather boring and the muscle stimulation is not as high as it could be.

I therefore prefer to use an undulating method which means that the numbers do not stay consistent from one set to the next. Here an example based upon the same maximum assessment as above:

Week 1

Mon: Set 1 – 8 reps | Set 2 – 10 reps | Set 3 – 7 reps | Set 4 – 7 reps | Set 5 – 8 reps | 40
Wed: Set 1 – 9 reps | Set 2 – 8 reps | Set 3 – 11 reps | Set 4 – 8 reps | Set 5 – 9 reps | 45

Fri: Set 1 – 10 reps | Set 2 – 9 reps | Set 3 – 9 reps | Set 4 – 12 reps | Set 5 – 10 reps | 50

Week 2

Mon: Set 1 – 11 reps | Set 2 – 10 reps | Set 3 – 10 reps | Set 4 – 11 reps | Set 5 – 13 reps | 55
Wed: Set 1 – 14 reps | Set 2 – 12 reps | Set 3 – 11 reps | Set 4 – 11 reps | Set 5 – 12 reps | 60

Fri: Set 1 – 13 reps | Set 2 – 15 reps | Set 3 – 12 reps | Set 4 – 12 reps | Set 5 – 13 reps | 65

Week 3

Mon: Set 1 – 14 reps | Set 2 – 13 reps | Set 3 – 16 reps | Set 4 – 13 reps | Set 5 – 14 reps | 70
Wed: Set 1 – 15 reps | Set 2 – 14 reps | Set 3 – 14 reps | Set 4 – 17 reps | Set 5 – 15 reps | 75

Fri: Set 1 – 16 reps | Set 2 – 15 reps | Set 3 – 15 reps | Set 4 – 16 reps | Set 5 – 18 reps | 80

Week 4

Mon: Set 1 – 19 reps | Set 2 – 16 reps | Set 3 – 16 reps | Set 4 – 17 reps | Set 5 – 17 reps | 85
Wed: Set 1 – 17 reps | Set 2 – 20 reps | Set 3 – 17 reps | Set 4 – 18 reps | Set 5 – 18 reps | 90

Fri: Set 1 – 18 reps | Set 2 – 18 reps | Set 3 – 21 reps | Set 4 – 19 reps | Set 5 – 19 reps | 95

Week 5

Mon: Set 1 – 17 reps | Set 2 – 17 reps | Set 3 – 24 reps | Set 4 – 20 reps | Set 5 – 22 reps | 100
Wed: Set 1 – 16 reps | Set 2 – 18 reps | Set 3 – 21 reps | Set 4 – 27 reps | Set 5 – 23 reps</stron | 105

Fri: Set 1 – 17 reps | Set 2 – 17 reps | Set 3 – 22 reps | Set 4 – 24 reps | Set 5 – 30 reps | 110

Week 6

Mon: Set 1 – 31 reps | Set 2 – 18 reps | Set 3 – 23 reps | Set 4 – 25 reps | Set 5 – 18 reps | 115
Wed: Set 1 – 16 reps | Set 2 – 35 reps | Set 3 – 24 reps | Set 4 – 26 reps | Set 5 – 19 reps | 120

Fri: Set 1 – 17 reps | Set 2 – 30 reps | Set 3 – 25 reps | Set 4 – 30 reps | Set 5 – 23 reps | 125

You will notice that the total amount of repetitions completed is exactly the same as the linear method, the only difference is the distribution of reps throughout the 5 sets.


100 Push Ups Program

I’ve had many emails from people who want to perform 100 push ups in one go. You can use either of the 2 programs above to achieve this goal.

If you want to complete one hundred push ups then you will need to perform a total of 200 repetitions over your 5 sets. Basically just continue on either of the programs above for another few more weeks and that will get you there.


Beyond the Regular Push Up

There are lots of variations of push up. As I mentioned earlier, hand positions and various feet positions will change both the instability of the shoulder and core muscles along with the demands placed on Shoulders and Triceps.

Once you can safely complete the regular push up for 30 – 50 reps then you can try some more advanced variations.

Here are a few Push Up variations:

# 1 – Stability Ball Push Ups


# 2 – Mountain Climber Push Up


# 3 – Push Ups With Leg Jumps


Conclusions

I hope you now feel like a Push Up expert and have the confidence to get out there are perfect this excellent exercise.

Get great at the Push Up and you can take it anywhere and stay in shape no matter where you are.

Now shoot for 100 push ups and let me know when you get there.

Over to You

Do you love the Push Up? Have you reached the magic 100 yet?


33 Kettlebell Exercises from Beginner to Advanced

By Greg Brookes

33 Kettlebell Exercises from Beginner to Advanced

Kettlebells are a great tool for improving your strength, cardio, movement skills, and of course for burning loads of calories.

Training with kettlebells is slightly different from using other pieces of equipment, like dumbbells, so I recommend you get some good quality instruction or see my guide here.

If you are ready to get started with your kettlebell training then here is a list of kettlebell exercises starting with the foundational exercises and progressing to the most advanced:


Foundational Exercises

# 1 – Slingshot

Kettlebell Slingshot

A great warm up and starter exercise that gets your accustomed to the weight of the kettlebell.

Keep you feet reasonably close together and hips still as you pass the kettlebell around your body in a circle changing hands at the back and at the front.

Try to keep everything tight throughout the whole movement.

Don’t forget to try both directions. 20 reps each way is a good start.


# 2 – Halo

Kettlebell Halo

Another warm up exercise that opens up the shoulder girdle and prepares the body for an oncoming workout.

Hold the kettlebell with both hands by the ball with the handle pointing upwards.

Take the kettlebell around the neck keeping the kettlebell as close to the neck as possible.

Turn the kettlebell over at the back. Your forearms should brush your forehead on the way around.

Try 10 in each direction.


# 3 – Single Arm Deadlift

Kettlebell Single Arm Deadlift

The perfect beginners exercise to practice the hip hinge.

The hip hinge ensures that when you bend forwards you bend from the hips rather than the lower back.

Stand over the kettlebell with it aligned between your toes.

Push your hips back and keep your chest up as you pick up the kettlebell.

Squeeze your buttocks at the top and reverse the movement. Your back should stay flat throughout the whole movement.


# 4 – Single Leg Deadlift

Single Leg Kettlebell Deadlift Exercise

A great core exercise that integrates both sides of the body as well as developing good movement skills.

Standing on one leg and holding the kettlebell in one hand lean forwards keeping your back flat.

The same leg that goes back is the same arm that you are holding the kettlebell with.

Go down as far as your hamstrings will allow and then return to the top position.

Your standing leg can have a slight bend during the movement.

Want More? Single Leg Deadlift, Everything You Need to Know


# 5 – Turkish Get Up

Kettlebell Turkish Get Up

The mother of all kettlebell exercises. Great for movement skills, core activation and shoulder stabilisation.

Starting on the floor with the kettlebell held above your chest, bend one leg and sit up.

Next sweep the straightened leg through to a lunge position and stand.

All you now need to do is reverse the movement.

Practice without a kettlebell to begin with, then a glass of water and finally your kettlebell.

Want More? Ultimate Guide to the Kettlebell Turkish Get Up


# 6 – Goblet Squat

Kettlebell Goblet Squat Exercise

A standard squat movement but holding the kettlebell with both hands and upside down.

The instability of the kettlebell during the goblet squat will help improve your general squatting movement pattern.

If you struggle to perform correct squats then you will need to regress to the bodyweight squat and work on your mobility, stability and motor control.


# 7 – Racked Squat

Kettlebell Racked Squat

This variation on the regular squat loads the body on the one side.

Whenever you load the body unilaterally your core and stabilsation muscles need to work hard to control the movement.

The racked position involves holding the kettlebell in the one hand with the ball resting in the crook of the arm.

Keep the elbow in tight as you squat up and down.

Want More? 7 Kettlebell Squats You Need to Know


# 8 – Racked Lunge

Kettlebell Racked Reverse Lunge Exercise

Lunges are a very important movement pattern and by adding a kettlebell to just one side they become even more challenging.

Just as with the racked squat the kettlebell is held with one hand in the racked position.

Take the same leg back as you are holding the kettlebell with and ensure that the knee goes low to the floor allowing for full activation of the glute muscles.

For the forward lunge use the opposite leg that you are holding the kettlebell with.


# 9 – Windmill

Kettlebell Windmill Exercise

Brilliant for improving mobility through the hips and hamstrings as well as improving your shoulder stabilisation.

Start with the kettlebell overhead and the arm locked straight.

Spread your feet to double shoulder width apart and angle your feet at 45 degrees.

Push your hips out to the side and while looking at the kettlebell take the opposite hand down and touch the floor between your legs.

Try to keep both legs straight throughout the whole exercise.

Want More? Complete Guide to the Kettlebell Windmill


# 10 – Single Handed Swing

Kettlebell Single Handed Swing

If the Turkish Get Up is the mother of all Kettlebell exercises then this is the father.

Once you have master the art of the hip hinge by practicing the single arm deadlift then you can progress to the swing.

Holding the kettlebell in one hand push the hips back and snap them forwards as you swing the kettlebell between you legs.

The back should be flat throughout the movement. Highly cardiovascular and great for a full body workout.


# 11 – Two Handed Swing

Two Handed Kettlebell Swing Exercise

Exactly the same movement as the Single Handed Swing but using both hands.

Many people find that the Single handed Swing is easier to learn first because when using one hand you are less likely to use your shoulder muscles to lift the weight rather than relying on your hip snap.

Ensure the back is kept flat throughout the whole movement.

Want More? Ultimate Guide to the Kettlebell Swing and Variations


# 12 – Alternating Swing

Kettlebell Alternating Swing

Another Swing variation but this time you change hands during every swing.

Ensure that you wait for the kettlebell to reach the top of swing before trying to change hands.

You have 2 options for changing hands either reaching over the other hand and switching or turning the kettlebell 90 degrees and changing hands from the side.


# 13 – Clean

Kettlebell Clean Exercise

One of the more technical kettlebell exercises that involves taking the bell from the floor up and into the racked position.

Ensure that the hips are the area that generate the power for the movement.

The thumb should point backwards at the bottom of the movement.

To prevent banging of the forearms try to take the arm around the kettlebell rather than the bell around the arm. Also aim to keep the bell as close to the body as possible.

Want More? How to Kettlebell Clean Like a Pro and Stop Banging Your Wrists


# 14 – Overhead Press

Pressing a kettlebell overhead can create some great shoulder and pressing strength.

Starting from the racked position crush the handle with your grip as your push the kettlebell straight overhead.

Ensure that you actively pull the kettlebell back down towards the chest using your Lat muscles to support the movement.

Keep a straight wrist throughout the whole movement.

Tight buttocks and core will also provide a more stable pressing platform.


# 15 – Clean and Press

Kettlebell Clean and Press Exercise

Putting the Clean exercise and Press exercise together forms what is often called “The Long Cycle”.

There are not many muscles that don’t get influenced by the Clean and Press.

As you link the 2 exercises together it is important to take a short pause between each movement.


# 16 – Thruster

Kettlebell Thruster Exercise

Here is another exercise that combines 2 exercises the Squat and the Press for maximum energy expenditure.

Start from the racked position and drop down into the Squat, next drive up from the floor and use your momentum to drive the kettlebell overhead.

Next control the kettlebell back down into the racked position and repeat.

The Thruster is a highly cardiovascular exercise that hits almost every muscle in the body.


# 17 – Bottoms Up Clean

Bottoms Up Clean Exercise

This variation on the standard clean will help to improve your core stability as well as your kettlebell movement skills.

I like to use the bottoms up clean as a good warm up before more challenging exercises.

Start as with the regular clean but this time finish with the kettlebell not in the racked position but upside down with you balancing the movement on the handle.

You will need good grip strength and control to maintain the upside down position.

Hold for 5 seconds and then return back to the start.


# 18 – Side Lunge

Kettlebell Side Lunge Exercise

If you are looking to build individual leg strength, good hip mobility and back stabilisation then this is the exercise for you.

Holding the kettlebell in both hands close to the chest take a sideways step, push the hips back and drop into a side lunge position.

Keep your chest up and weight on your heels.

One leg should bend while the other remains straight.

Try to work at getting deeper and deeper each repetition. The lower you can go the better the Glute muscle activation.

Want More? 16 Kettlebell Lunge Variations from Beginner to Advanced


# 19 – Bob and Weave

Kettlebell Bob and Weave Exercise

Similar in movement to the Side Lunge but this exercise is a bit more dynamic and really gets the heart rate up.

Hold the kettlebell high up the chest with both hands and step out to the side, duck down as if trying to get underneath a low doorway and then bring your other foot across to meet the foot that stepped out.

Make sure that all the movement comes from a hinging at the hips rather than bending forwards at the lower back.

The back should remain flat throughout the movement.


# 20 – Kettlebell Row

Kettlebell Row Exercise

The first of the rowing movements and this one is simple providing you get your back in the correct position.

Bend over at the hips ensuring that you maintain a flat back and that your chest is lifted.

Look down at about 2 metres in front of you. Keep your feet at shoulder width apart.

Grab the kettlebell with one hand from between your legs and row the kettlebell back towards your one hip.

Your back should remain stationary at a 45 degree angle to the floor during the whole exercise.

Want More? 10 Kettlebell Exercises for the Back here


Advanced Exercises

# 21 – Pistol Squat

Kettlebell Pistol Squat

The ultimate leg exercise but requires lots of strength, stability and mobility to perform it correctly.

Standing on one leg hold the other out in front of you just above the ground.

Next push the hips back and squat down keeping the other leg off the floor.

You should drop down as low as your heel on the floor.

Next drive up from the ground place all your weight on your heel. The one leg should not touch the floor through the whole exercise.

Hold the kettlebell with both hands in front of you as a counterbalance.


# 22 – Overhead Squat

Kettlebell Overhead Squat

This version of the squat really works your core muscles as well as shoulder, upper back and general stabilistion.

Hold the kettlebell overhead with a locked out arm.

Next drop into the squat position by pushing your hips backwards. All your weight should be on your heels.

At the bottom of the squat push up from the floor back to the starting position.

The kettlebell should remain overhead throughout the exercise.


# 23 – Deck Squat

Kettlebell Deck Squat

A fun exercise that works a lot of muscles at once but also requires good hip mobility.

Start by holding the kettlebell in both hands.

Next drop into a deep squat and the roll back onto the floor keeping your feet on the ground.

Take the kettlebell overhead and raise your hips up into a bridge position.

Finally throw your arms and kettlebell forwards as you return to the deep squat position and then finally stand.

The key to this exercise is the aggressive throwing of your weight forwards giving you the momentum to get back into the bottom part of the squat.


# 24 – Tactical Lunge

This lunge variation requires a lot of coordination but is excellent for advancing your lunging skills.

Start with the kettlebell in both hands and hanging in front of you.

Next take a step back into a reverse lunge.

As a gap appears underneath your front leg pass the kettlebell underneath from one hand to the other.

Finally return to the standing position with the kettlebell held in both hands again.

Continue to lunge with the same leg creating a circular movement underneath the front leg.


# 25 – Overhead Lunge

Similar to the Overhead Squat this lunge increases the amount of core activation as well as shoulder stabilisation.

Press the kettlebell overhead and lock your arm keeping your wrist straight.

Next take a good step forwards into a lunge position.

Try to ensure that the back knee kisses the floor or gets as close as possible.

Finally return back to the start position.

The kettlebell should remain overhead for the entire exercise.


# 26 – Side Lunge and Clean

Have you tried combining the Side Lunge with the Clean?

This exercise requires a lot of good coordination, skill, mobility and core strength.

Start with the kettlebell in the racked position.

Step out into a side lunge to the same side as you are holding the kettlebell.

At the same time as stepping out take the kettlebell down into the bottom position of the clean.

Next drive up from the heel back to the starting position and at the same time cleaning the kettlebell back to the racked position.


# 27 – Circular Swings

One of my favourite dynamic kettlebell exercises but can be dangerous if you are not ready for it.

Start with the kettlebell in one hand and then swing the kettlebell across the body and up to around head height.

The kettlebell then swings back down across the body as you rotate to absorb the mass.

Drive with the core muscles and swing the bell back to the top position.

Be very careful you don’t hit your knees with the kettlebell.


# 28 – Circular Clean

Similar in some ways to the Circular Swing but this time you begin in the racked position.

Rotate the body slightly in the direction of the kettlebell and push the bell out, swing it across your body and then return it to the racked position.

The exercise is like performing a regular clean but the kettlebell swings across the body each time rather than going up and down.

Again, watch those knees!


# 29 – Walking Swings

Lets take the Swing to the next level.

There are many ways to add further demands to the Swing but one way is to walk forwards, backwards or to the side with each repetition.

This may sound difficult but once you have mastered the swing adding an extra step each swing isn’t usually a problem.

A nice challenge is to swing walking from one tree to another tree, or the length of a football pitch!


# 30 – High Pulls

Kettlebell High Pull Exercise

A great pulling exercise for the back of the body that also gets the heart rate seriously racing.

Perform a regular Single Handed Swing but at the top of each Swing movement pull your arm in towards your body.

Keep your wrist straight and elbow nice and high.

Next push the kettlebell out and back down into the bottom part of the swing.

If you haven’t performed this exercise before it is probably the most cardiovascular kettlebell exercise you will ever experience.

Want More? How to Master the Kettlebell High Pull


# 31 – Snatch

Kettlebell Snatch Exercise

Ever heard of the 10 minute Snatch challenge?

The Snatch uses everything you have got to take the kettlebell from the bottom of the Swing to overhead.

Again starting from the Single Handed Swing, swing the kettlebell up at around head height, pull the kettlebell towards you and then push up.

Next throw the kettlebell out and absorb the mass at the bottom of the swing. Then repeat.

Once mastered try 10 minutes of Snatches changing hands as many times as you wish but without putting the kettlebell down.

Want More? Ultimate Guide to the the Kettlebell Snatch


# 32 – Sotts Press

A very tough pressing exercise that require good mobility and core strength.

Start with the kettlebell in the racked position and then drop down into a deep squat.

At the bottom of the Squat press the kettlebell overhead and then return it back to the racked position before standing.

You will need good mobility in your upper back to perform this exercise well.


# 33 – Renegade Row

Kettlebell Renegade Row or Plank Row

A very powerful core exercise when performed properly and also great for building the back of the body.

You will need 2 kettlebells for this exercise.

Start in a Push Up position with both hands on the handles of the kettlebells.

Next row one kettlebell back towards your hips keeping your body and back nice and flat.

Return the kettlebell to the ground and repeat on the other side.

If you cannot remain in a good plank position throughout this exercise then it is too advanced for you.

How about 2 Kettlebells?

If you really want to increase the demands and take your Kettlebell training to the next level you could always try some exercises holding a kettlebell in each hand.

Swings, Cleans, Squats and Presses are a great introduction.


Love Kettlebell Training? See My Kettlebell Workouts Website here

  • « Go to Previous Page
  • Page 1
  • Page 2
  • Page 3
  • Page 4
  • Interim pages omitted …
  • Page 6
  • Go to Next Page »
GB Personal Training Ltd

-

Greg Brookes is the founder of GB Personal Training Ltd and KettlebellsWorkouts.com. He has been featured in Men's Health, Women's Fitness, Men's Fitness, and Health & Fitness Magazine, where he wrote a monthly column. He has also been featured in the majority of UK national newspapers. Labelled as "the trainer to the trainers" he delivers seminars and a regular newsletter to help Personal Trainers improve their skills and achieve better results for their clients. Continue reading

Top Articles

  • 41 Full Body Medicine Ball Exercises
  • 500 Bodyweight Workout Challenge
  • Complete Guide to Kettlebell Training
  • Why Your Hamstrings are Tight
  • Top 13 Functional Training Exercises
  • 17 Bodyweight Cardio Exercises
  • 13 Hip Mobility Exercises to Ease Lower Back
  • 7 Popular Exercises You Must Avoid
  • How to Perform 100 Push Ups
  • 33 Kettlebell Exercises
  • 12 Exercises to Build Better Buttocks
  • 7 Foods That Have More Calcium Than Milk
  • Top 5 Kettlebell Exercises for Interval Training
  • Your Complete Guide to Warming Up

Kettlebell Programs

Kettlebell Programs
  • Workouts
  • About
  • Blog
Kettlebell Workouts | Kettlebell Exercises | Privacy Policy | Terms| Disclaimer

Copyright © 2026 GB Personal Training Ltd . All rights reserved.