• Skip to primary navigation
  • Skip to main content
  • Skip to primary sidebar

GB Personal Training Ltd

Health, Fitness & Wellbeing

  • Workouts
  • About
  • Blog

Complete Guide to Kettlebell Training from Beginner to Advanced

By Greg Brookes

Complete Guide to Kettlebell Training from Beginner to Advanced

I guess for many people Kettlebell Training may be how you first discovered me. I was one of the first to introduce Kettlebell Classes into London and still teach Kettlebells to this day.

Kettlebells are a very powerful tool that can be extremely effective but they can also be hugely ineffective if abused.

In today’s post I’m going to lay out exactly how you should approach Kettlebell Training to get the most benefits from it while minimising injury at the same time.


History of Kettlebells

If you have not seen or heard of kettlebells before then allow me to give you a very quick overview.

A kettlebell is a solid heavy ball with an offset handle just large enough to place your hand through.

The origins of the kettlebell are a little vague but they can be traced back hundreds of years.

Weights with handles were often used during fitness challenges for both carrying and throwing events and it’s believed that the kettlebell simply evolved from here.

Later the Kettlebell was adopted by the Soviet forces for training their soldiers and then finally gained popularity in the west.


Benefits of Kettlebell Training

Kettlebells are a tool just like any other piece of fitness equipment, they can be used correctly or they can be used incorrectly.

The kettlebell is pulled, pushed, and swung in a dynamic nature causing excessive demands on the body.

Here are 7 benefits of kettlebell training:

  1. Offset Handle enables swinging of the kettlebell
  2. Kettlebell Swinging increases the load and so increases the demands required to decelerate the kettlebell
  3. Swinging increases the demand on stabilisation muscles as they work harder to keep joints aligned
  4. Swinging the Kettlebell increases Lunge and Heart Capacity as multi-joint movements require more oxygen
  5. Kettlebell Swinging requires no movement of the feet meaning a Full Body workout requiring little workout space
  6. Kettlebell Exercises involve full body movements connecting head to toe and improving core integration
  7. Regular Kettlebell Training increases ligaments and soft tissue strength due to the dynamic movements

Selecting the Correct Kettlebell

Since Kettlebells have become popular in gyms and with personal trainers, more and more companies have started selling them.

Be careful!

Not all kettlebells are created equal.

Here’s a quick guide to buying your first kettlebell:

Competition Kettlebells

Competition Kettlebell
These kettlebells have a more square handle and the body of the kettlebell stays the same size regardless of the weight.

These bells are designed for competition and the narrow handle enables minimum movement of the hand inside the handle.

These kettlebells are great for single handed exercises but for the beginner they offer little room to hold the kettlebell with two hands.

Cast Iron Kettlebells

Cast Iron Kettlebell
These are my kettlebell of choice, they have a slightly rounded handle and a solid cast iron ball.

The kettlebell should be smoothly shaped and have no sharp corners.

The space between the handle and the ball should be just large enough to push a horizontal closed fist through but not so large that you can push a vertical closed fist through.

Types of Kettlebells to Avoid

  1. Anything that is made of vinyl, I haven’t seen a good one yet!
  2. Any Kettlebell with a flat plastic or rubber foot attached to the bottom
  3. Kettlebells with very large handles, use the fist test as detailed above
  4. All Kettlebells that have sharp corners, lines or edges

Selecting the correct kettlebell is vital as you will find out when you start training.

Badly designed kettlebells will destroy your wrists, band up your forearms and seriously reduce the pleasure of your training.

==> If you shop on Amazon.com then I recommend buying these Kettlebells


What Kettlebell Weight to Use

Recommended kettlebell weight sizes for men and women

Kettlebells traditionally come in a number of different weights, here’s my guide to what weight to use:

  • 8kg or 17lbs – Starting Weight for Women, I’ve never trained a women who shouldn’t start here. Remember this isn’t Dumbbell training!
  • 12kg or 26lbs – Unconditioned Men start here and Women advance to here very quickly
  • 16kg or 36lbs (Original Weight) – Average Conditioned Men start here, and many women progress to this weight within 6-12 months
  • 20kg or 44lbs – A natural progression for men and some women use this for Swings
  • 24kg or 52lbs – (Original Weight) – This is the goal for men and a nice demanding weight for most exercises.
  • 28kg or 61lbs – It’s a big leap from 24kg to 32kg so this can help bridge the gap.
  • 32kg or 70lbs – (Original Weight) – I like this weight for Swings and Turkish Get Ups

Due to the increased popularity of kettlebell training many manufacturers have started to produce smaller and interim weight sizes. Stick to the weights above and I’m sure you will find you don’t need any other sizes.

Most men can survive with just a 16kg kettlebell for some time and most women can benefit from an 8kg and a 12kg.


Where to Start – Level 1 (Stabilisation)

Most people jump in and start with kettlebell exercises that are way too advanced for them and end up getting injured or developing bad habits.

As with everything in life we need to start off with the basics and build a strong foundation.

The human body is built from Stabilising Muscles and Prime Mover muscles.

Our stabiliser muscles are smaller and weaker but better at endurance work, they stabilise the joints enabling a strong platform for the larger muscles to work from.

The Prime Mover muscles are larger muscles and they provide the large movements, the quads are a great example.

Due to our current sitting lifestyles and the advent of weight training machines most of us have very badly conditioned stabiliser muscles meaning that our big muscles work but on a very shaky foundation.

So, in order to build a solid foundation and avoid injury we need to work on the stabiliser muscles first.

Here are 2 kettlebell exercises that every one should master before moving on:


# 1 – Kettlebell Turkish Get Up

Kettlebell Turkish Get Up

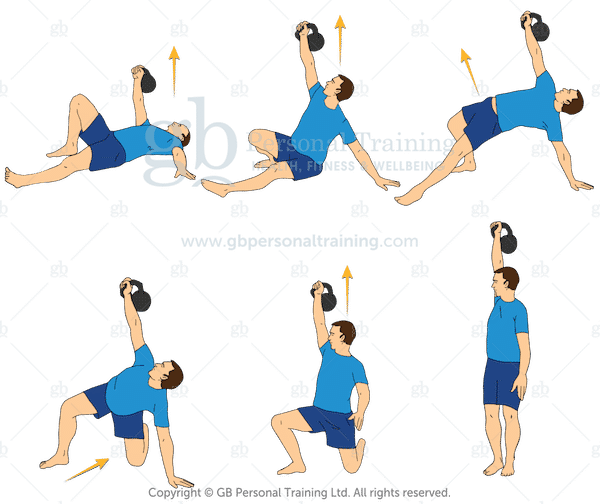
The Turkish Get Up is a full body exercise that takes you through most of the fundamental movement patterns conditioning your core and stabiliser muscles in the process.

The Turkish Get Up is probably one of the best all over body stabilisation exercises and has been around for hundreds of years.

It is believed that the Greeks would NOT train a boy with weights until he could get up from the floor with a weight held above his head.

This concept mirrors my philosophy that we should not be training with any resistance until we have a strong enough stabilisation system to deal with it.

The Turkish Get Up involves 7 stages:

  1. From the Fetal position roll onto your back and help the bell into the straight arm position. Don’t take your eyes off the bell
  2. Bend the leg on the same side as the bell and place the opposite arm out at 45 degrees
  3. Crush the handle as you sit up along the line of your arm, first to elbow and then to hand. Keep the kettlebell arm down and in its socket and the opposite shoulder away from the ear
  4. Push from the heel of the bent leg and drive your hips in the air and into full hip extension. There should be a straight line from bell to bottom hand
  5. Sweep the straight leg back and through to a half kneeling position
  6. Taking the hand off the floor straighten the body and take the eyes off the bell and look forwards
  7. Drive from the front heel and stand. Steady yourself and then reverse the movement

Here’s a video of the Turkish Get Up in Action:

 
Related: Ultimate Guide to the Kettlebell Turkish Get Up


# 2 – Kettlebell Single Leg Deadlift


Single Leg Kettlebell Deadlift Exercise

The Single Leg Deadlift teaches you to hinge at your hips while maintaining a solid core and shoulder structure.

Again you are teaching your body here how to stabilise during movement.

If you can’t handle this movement then you certainly won’t be able to handle the kettlebell when it’s swinging at speed.

Here are my tips on the Single Leg Deadlift:

  1. Maintain a solid grip with the shoulder and back in alignment at all times
  2. Keep a soft knee on the standing leg and weight on the heel
  3. Instigate the movement by taking the one leg backwards
  4. Don’t over rotate the rear leg outwards and descend slowly with control
  5. NEVER ARCH YOUR LOWER BACK
  6. Only go as deep as your flexibility will allow

This is a tricky exercise and many people find they bend at their lower back trying to get the kettlebell to the floor, don’t do this.

If your hamstrings will only allow you to get to 12 inches from the floor, that’s fine, just stop and return to the start position.

Here’s a Video of the Kettlebell Single Leg Deadlift in Action:

 
Related: Single Leg Deadlift, Everything You Need to Know


Stabilisation Workout Program

Now you have an understanding of the two fundamental kettlebell exercises that I recommend for improving the stabilising muscles, let’s put them together into a monthly workout program.

Week 1 – Practice Week

  • Monday: Turkish Get Up  (No Kettlebell) – 10 reps, 5 each side
  • Tuesday: Single Leg Deadlift (No Kettlebell) – 5 reps each side x 2 sets
  • Wednesday: Turkish Get Up (No Kettlebell) – 5 reps each side x 2 sets
  • Thursday: Single Leg Deadlift (No Kettlebell) – 5 reps each side x 2 sets
  • Friday: Turkish Get Up (Holding Glass Water) – 5 reps each side x 2 sets
  • Saturday: Single Leg Deadlift (No Kettlebell) – 5 reps x 3 sets
  • Sunday: Rest

Week 2 – Adding Load

  • Monday: Turkish Get Up  (Holding Glass of Water) – 5 reps each side x 3 sets
  • Tuesday: Single Leg Deadlift (With Kettlebell) – 5 reps each side x 2 sets
  • Wednesday: Turkish Get Up (Holding Glass of Water) – 8 reps each side x 2 sets
  • Thursday: Single Leg Deadlift (With Kettlebell) – 8 reps each side x 2 sets
  • Friday: Turkish Get Up (With Kettlebell) – 3 reps each side
  • Saturday: Rest
  • Sunday: Rest

Week 3 – Combining Exercises

  • Monday: Turkish Get Up  (With Kettlebell) – 5 reps each side
  • Tuesday: Single Leg Deadlift (With Kettlebell) – 5 reps each side x 3 sets
  • Wednesday: Rest
  • Thursday: Single Leg Deadlift (With Kettlebell) – 5 reps each side x 2 sets
  • Follow With:Turkish Get Up (With Kettlebell) – 3 reps each side
  • Friday: Rest
  • Saturday:Single Leg Deadlift (With Kettlebell) – 8 reps each side x 2 sets
  • Follow With: Turkish Get Up (With Kettlebell) – 5 reps each side
  • Sunday: Rest

Week 4 – Progressing

  • Monday:Single Leg Deadlift (With Kettlebell) – 5 reps each side x 3 sets
  • Follow With: Turkish Get Up (With Kettlebell) – 3 reps each side x 2 sets
  • Tuesday: Rest
  • Wednesday: Single Leg Deadlift (With Kettlebell) – 5 reps each side x 3 sets
  • Follow With:Turkish Get Up (With Kettlebell) – 5 reps each side x 2 sets
  • Thursday: Rest
  • Friday:Single Leg Deadlift (With Kettlebell) – 5 reps each side x 3 sets
  • Follow With:Turkish Get Up (With Kettlebell) – 3 reps each side x 3 sets
  • Saturday: Rest
  • Sunday: Rest

The objective of the above 4 week program is to build skill and confidence with the movements.

The movements should be challenging but not too hard.

The hard workouts come later.

Take your time, be consistent and build beautiful movement patterns.

You will really benefit from this in the long run.

Don’t cut corners or think you are too cool for these short workouts, get great at the finer details.

If you find the above workout plan too challenging then continue to repeat each week until you feel you are ready to move on.


Dynamic Kettlebell Training – Level 2

You should now have bomb proofed your body ready for more dynamic kettlebell exercises.

Here is where you start to work a little harder and really feel the benefits of the ballistic movements of the kettlebell.

Again I have to warn you.

Just as quickly as a kettlebell can improve your body it can undo it just as fast.

If you haven’t mastered the Single Leg Deadlift or the Turkish Get Up then you need to do that first!

Here are the 3 Fundamental Kettlebell Exercises that take advantage of the fundamental movement patterns that we are all designed to use anatomically…


# 1 – Kettlebell Two Handed Swing

Two Handed Kettlebell Swing Exercise

The first and by far the most characteristic kettlebell exercise is the Kettlebell Swing.

The Swing involves the deadlift pattern or hinging at the hips.

During this exercise you will activate almost every muscle in your body and in particular the posterior chain or back line of the body.

Kettlebell Swings are highly effective at raising your heart rate, improving your posture and building strength endurance.

Here are my tips for the Kettlebell Swing:

  1. Hinge at the hips NOT the lower back
  2. Stand Tall and Squeeze your Abs & Buttocks
  3. Load the heels NOT the toes
  4. Maintain a Flat Back through the exercise
  5. Lift the Chest and keep the Shoulders in their sockets
  6. Ensure the shins track the line of the feet
  7. Breathe OUT on the way down and IN on the way up

Here’s a Video Tutorial of the Kettlebell Swing:

 
I would recommend that you start with the two handed Swing first and then progress to the one handed swing later.

The movement principles are exactly the same between the two exercise you just hold the kettlebell with both hands rather than one.

Related: Ultimate Guide to the Kettlebell Swing and Variations

A Note about Hamstring Length

As you enter the bottom of the Kettlebell Swing and your pelvis rotates forwards your hamstrings will be on stretch.

If you have tight hamstrings due to Core Activation discrepancies, injuries or lack of movement skills, then your lower back will start to arch to assist you in the depth of the swing.

It is VERY IMPORTANT that you do not let this happen.

You must adjust the depth of your Swing so that your Hamstrings DO NOT over stretch at the bottom portion of the swing.

If you have problems touching your toes or know that you have tight hamstrings when you lean forward then DO NOT swing too deep or far between your legs. Keep your swings shallow!


# 2 – Kettlebell Goblet Squat

Kettlebell Goblet Squat Exercise

We all know that the Squat is an incredible and extremely natural movement pattern.

Like the Swing it uses most muscles in the body and helps up sit down and stand up from a chair, toilet etc.

Once you have mastered the Bodyweight Squat then you can perform a Kettlebell Squat.

There are 2 basic holding positions for the Squat, either with both hands or with just one hand.

If you hold the Kettlebell with just one hand then you load one side of the body encouraging additional stabilisation to centralise the movement.

Here are my tips for the Kettlebell Squat:

  1. Load the heels and the back of the body
  2. Ensure Shins align with the line of the feet
  3. Sit the hips back as if in Ski Boots
  4. Keep your Chest Up as you hold the Kettlebell
  5. Keep your Shoulders back and Back Muscles Engaged
  6. Push the ground away from you as you drive up through your heels
  7. Squeeze your Buttocks tight at the top

Here’s a Video of the Kettlebell Goblet Squat:

 
Related: 7 Kettlebell Squats You Need to Know


# 3 – Kettlebell Reverse Lunge

Kettlebell Racked Reverse Lunge Exercise

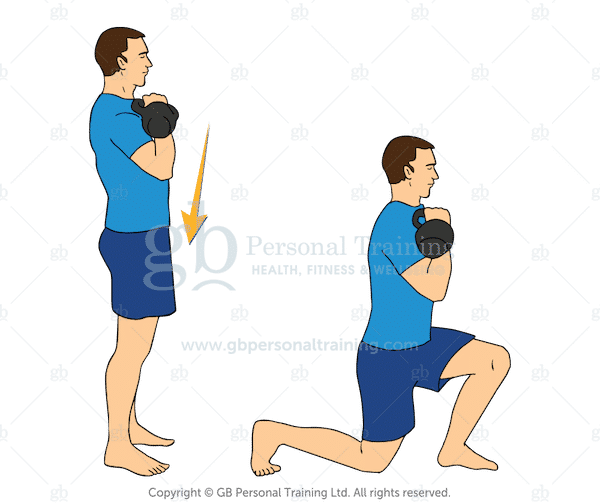
Just like the Swing and the Squat the Lunge is a fundamental movement that utilises most muscles in the body.

Can you see a theme taking place here?

Kettlebells are effective if you use the exercises that utilise the correct movement patterns along with the largest amount of muscle recruitment.

The Lunge requires more neurological involvement that the other 2 exercises.

You need good balance and core stabilisation to prevent you from losing your balance.

Similar to the Squat the Kettlebell can be held either in one hand or by both hands.

One hand will be more challenging and add an extra dimension of stabilisation to the exercise.

Here are my tips on performing the Kettlebell Reverse Lunge:

  1. Step back with confidence, feet shoulder width apart
  2. Keep your core tight to stabilise the pelvis and prevent wobble
  3. Aim to kiss your back knee to the floor
  4. Give yourself room by taking a good step back but not so far that it becomes a stretch
  5. Pull yourself back up from your front heel
  6. Keep your Chest lifted throughout the movement

Here’s a Video of the Kettlebell Reverse Lunge:

 
The Lunge can be performed Forwards, Backwards, Sideways and Diagonally.

I recommend that you start with the reverse lunge first. It’s the easiest Lunge to control while holding a Kettlebell.

Related: 16 Kettlebell Lunge Variations from Beginner to Advanced


Dynamic Kettlebell Workout Plan

Now you have 3 new kettlebell exercises that you can add to your workouts. Dynamic Kettlebell Exercises are much more challenging so we have to be careful with recovery times.

Here is a monthly workout plan for you to try:

Week 1 – Acclimatisation

  • Monday: Two Handed Kettlebell Swing – 20 secs / 30 secs rest x 3
  • Tuesday: Two Handed Kettlebell Reverse Lunge – 30 secs / 30 secs rest x 3
  • Wednesday: Rest
  • Thursday: Two Handed Kettlebell Swing – 20 secs / 30 secs rest x 3
  • Friday: Two Handed Kettlebell Squat – 30 secs / 30 secs rest x 3
  • Saturday: Rest
  • Sunday: Rest

Week 2 – Beginner

  • Monday:Two Handed Kettlebell Swing – 20 secs / 30 secs rest x 4
  • Tuesday:Two Handed Kettlebell Reverse Lunge – 30 secs / 30 secs rest x 3
  • Wednesday:Two Handed Kettlebell Squat – 30 secs / 30 secs rest x 4
  • Thursday: Rest
  • Friday: Two Handed Kettlebell Swing – 20 secs / 30 secs rest x 4
  • Followed By:Two Handed Kettlebell Reverse Lunge – 30 secs / 30 secs rest x 3
  • Saturday: Rest
  • Sunday: Rest

Week 3 – Progressive

  • Monday:Two Handed Kettlebell Swing – 30 secs / 30 secs rest x 3
  • Tuesday:Two Handed Kettlebell Swing – 30 secs / 30 secs rest x 3
  • Followed By:Two Handed Kettlebell Reverse Lunge – 30 secs / 30 secs rest x 3
  • Wednesday: Rest
  • Thursday:Two Handed Kettlebell Swing – 30 secs / 30 secs rest x 4
  • Followed By: Two Handed Kettlebell Squat – 30 secs / 30 secs rest x 3
  • Friday: Rest
  • Saturday:Two Handed Kettlebell Swing – 30 secs / 30 secs rest x 4
  • Follow With:Two Handed Kettlebell Reverse Lunge – 30 secs / 30 secs rest x 3
  • Sunday: Rest

Week 4 – Adding Get Ups

  • Monday:Two Handed Kettlebell Swing – 30 secs / 20 secs rest x 4
  • Follow With:Turkish Get Up (With Kettlebell) – 3 reps each side x 2 sets
  • Tuesday: Rest
  • Wednesday:Two Handed Kettlebell Swing – 30 secs / 20 secs rest x 4
  • Follow With:Two Handed Kettlebell Reverse Lunge – 30 secs / 30 secs rest x 3
  • Thursday:Turkish Get Up (With Kettlebell) – 5 reps each side x 2 sets
  • Friday:Two Handed Kettlebell Swing – 30 secs / 20 secs rest x 5
  • Saturday:Two Handed Kettlebell Squat – 30 secs / 20 secs rest x 4
  • Sunday: Rest

You will notice that all Kettlebell exercises above are Two Handed.

I recommend this format for the first 4 weeks.

As your movement and strength improves then you can move onto single handed exercises.

I’ve kept the format very simple.

Again, don’t be too impatient, stick to the program, you are using a lot of muscle mass during each workout so don’t overdo it.

If you find that the workout is too much then either reduce the time, increase the rest or reduce the amount of sets.

Most of all practice the movements and perfect your technique.


Advanced Kettlebell Exercises – Level 3

Even if you only practiced and used those 5 exercises that I have described you could get fitter, stronger and move better than 99% of the gym population.

But there is more, a lot more that you can learn.

Here are 3 more exercises that you can add to your Kettlebell Toolkit to really supercharge your workouts when you are ready:


# 1 – Kettlebell Clean

Kettlebell Clean Exercise

This is the next progression on from the Kettlebell Swing.

Once you have mastered both the Single Handed Swing and the Double Handed Swing, Squat and Lunge then this should be next on your list.

The Clean takes the Kettlebell from the floor and places it into the racked position in the ‘V’ of your arm.

From this position you then have the option to Press the Kettlebell, Squat, or Lunge.

Of all the Kettlebell Exercises this is the most technical for some and many end up with bruised wrists or forearms.

Using the correct shaped kettlebell and keeping the bell close to the body will certainly help improve your skill.

Here is a video of the Kettlebell Clean:


Related: How to Kettlebell Clean Like a Pro and Stop Banging Your Wrists


# 2 – Kettlebell High Pull

Kettlebell High Pull Exercise

Once you have mastered the Clean you can practice the High Pull.

The High Pull is very difficult for some to master, you need good wrist strength and confidence in your movement skills.

Start off light and increase the weight later.

The High Pull is hugely Cardiovascular, more so than any other Kettlebell exercise.

Plus as you tire your technique becomes even harder to maintain. Again start slow and build up.

Here’s a video of the Kettlebell High Pull exercise:

 
Related: How to Master the Kettlebell High Pull


# 3 – Kettlebell Snatch

Kettlebell Snatch Exercise

Finally we are into the Kettlebell Snatch.

Hugely dynamic and requiring a lot of confidence in your own strength and skill as the kettlebell is thrown overhead.

Start light and practice.

The Snatch uses most of the muscles in the body and puts great demands on your shoulder stability, core strength, and explosive power.

This exercise is definitely for advanced athletes only!

Here’s a Video of the Kettlebell Snatch:

 
Related: Ultimate Guide to the the Kettlebell Snatch


3 Advanced Kettlebell Circuits

Workout 1

Do not put down the kettlebell during this workout.

Feel the flow as you move from one exercise to the next.

Only rest at the end of the circuit.

  • Swing Left – 30 secs
  • Swing Right – 30 secs
  • Clean Left – 30 secs
  • Clean Right – 30 secs
  • Reverse Lunge Left – 30 secs
  • Reverse Lunge Right – 30 secs
  • Squat and Press Left – 30 secs
  • Squat and Press Right – 30 secs
  • Rest 60 seconds / Repeat for a Total of 3 Circuits

Workout 2

As with Workout 1 try not to put the Kettlebell down between exercises.

Keep pushing.

This is a tough sequence, that will challenge your grip strength too!

  • Swing Left – 30 secs
  • Swing Right – 30 secs
  • High Pull Left – 30 secs
  • High Pull Right – 30 secs
  • Snatch Left – 30 secs
  • Snatch Right – 30 secs
  • Reverse Lunge & Press Left – 30 secs
  • Reverse Lunge & Press Right – 30 secs
  • Rest 60 seconds / Repeat for a Total of 3 Circuits

Workout 3

For this workout we are working more on endurance, see how you get on especially when you encounter 60 seconds of High Pulls at the end..very tough!

Run through this circuit only once.

  • Swing Left – 60 secs
  • Swing Right – 60 secs
  • Rest 30 secs
  • Clean & Press Left – 60 secs
  • Clean & Press Right – 60 secs
  • Rest 30 secs
  • Snatch Left – 60 secs
  • Snatch Right – 60 secs
  • Rest 30 secs
  • Squat & Press Left – 60 secs
  • Squat & Press Right – 60 secs
  • Rest 30 secs
  • High Pulls Left – 60 secs
  • High Pulls Right – 60 secs

Conclusions

OK, that should be enough to keep you going for a while.

Remember to start at the beginning and improve your stabilisation muscles first before moving on.

Once you have mastered the Turkish Get Up and Single Leg Deadlift then you can start on the more Dynamic exercises like the Swing.

Finally as you hone your skills and your body adapts progress onto more advanced exercises like the Clean, High Pulls and Snatch.

Enjoy your Kettlebell Training and please be safe!


Enjoy Kettlebell Training? See my Kettlebell Workouts website here


22 Scientific Core Exercises Using No Equipment

By Greg Brookes

22 Scientific Core Exercises Using No Equipment

The core muscles are the most important muscles in the body for movement.

Not only do strong core muscles look good but they connect the top half of the body to the bottom half.

A good well functioning core means more power, a well protected spine and a tight midsection.

You don’t need all the latest gadgets and gizmos to exercise your core muscles just some sensible and scientific bodyweight exercises.


# 1 – Bird Dogs

Bird Dog Core Exercise

A fundamental exercise that everyone should include in their workout program at some time.

Start on all fours with knees under hips and hands under shoulders.

Extend opposite arm and opposite leg as far as possible concentrating on lengthening the body.

Next bring the knee and elbow together while contracting the core muscles.

Repeat on the other side.

Breathe in as you lengthen the body.


# 2 – Back Extensions

Back Extensions Core Exercise

The core does not just involve the abdominal muscles it stretches all the way around the body.

This exercise works on your back extensors and helps to improve your posture.

Lie on your belly with the arms stretched out in front.

Take a big breath in as you lift both arms and legs off the floor.

Hold for a few seconds and return back down.

Don’t strain your neck, keep looking down at the floor.


# 3 – Skydivers

Similar to the Back Extension exercise above but with the arms at your sides.

Lift up only the upper part of your body while at the same time rotating the arms outwards to bring the shoulder blades together.

Hold at the top position for up to 30 seconds.

Keep the neck neutral by always looking down and the buttocks squeezed tightly.


# 4 – Standing Elbow to Knee

Stamding Elbow to Knee Core Exercise

A great core warm up exercise and great for integrating the left and right brain hemispheres.

From a tall standing position raise one knee to the opposite elbow and then repeat on the other side.

The movement should be slow and controlled.

Try 20-30 as a warm up exercise.


# 5 – Front Plank

The exercise that everybody knows.

Prop yourself up on your forearms and toes to activate all those muscles from shoulders to toes.

Ensure that your elbows are directly underneath your armpits or further forward to increase the intensity.

Keep your buttocks tight, back flat and don’t sag at the hips.


# 6 – Front Plank – One Arm, One Leg

Same as the regular front plank but to challenge your core stabilizer muscles further try lifting one leg or one arm.

You can have fun with this exercise by setting a timer to beep every 10 seconds and then rotate around from limb to limb.

So you may start lifting the left leg, then the right leg, then the left arm and finally the right arm.


# 7 – Side Plank

Side Plank Core Exercise

Another of the plank based exercises that targets the lateral core muscles.

The side plank involves holding your body at 90 degrees to the floor propped up on your forearm and side of your foot.

You can either stack the feet on top of each other or place one in front of the other.

Keep the hips high and maintain a good right angle with the floor.

Beginners can start from their knees or even use a wall behind them to maintain good alignment.


# 8 – Side Plank with Knee

Once the side plank has been mastered you can progress to this more challenging exercise.

Start in the regular side plank position with the hips nice and high.

Next bend the top leg and pull the knee to the chest.

Hold at the chest for a second or two and then return to the start position.

Don’t rush it, enjoy it!


# 9 – Side Plank with Extension

Side Plank with Extension Core Exercise

Another Side Plank variation that involves some lateral flexion so you will really feel this one from the hips to the shoulders.

Start in the regular Side Plank position with the hips high.

Next lower the hips to the floor, touch the ground lightly and then push them up as high as possible.

Ensure the hips stay at 90 degree to the floor throughout the exercise.

Keep them slow!


# 10 – Push Up Hold

Similar to the front plank exercise but this time from the hands rather than the forearms.

Basically you hold a Push Up start position keeping the back flat, buttocks tight, arms locked and core braced.

You can balance a pole along the back to check alignment but the hips should never drop.


# 11 – Shoulder Taps

Shoulder Taps Core Exercise

A great progression on from the Push Hold that challenges the core stabilizing muscles even more.

Starting with the static Push Up hold slowly raise one hand and touch the opposite shoulder.

Replace the hand back down and repeat on the other side.

Try to keep the hips square during each tap.

The closer the feet are together the more difficult the exercise.


# 12 – Walk Outs

A simple exercise but very demanding for the core muscles.

Start in the Push Up Hold position and then slowly walk your hands out one inch at a time.

Go as far forwards as you can until you feel your hips are about to drop and then slowly walk back again.

Keep each hand movement to only one inch and move slowly for maximum results.


# 13 – Slow Mountain Climbers

Slow Mountain Climbers Core Exercise

One of my favourite core exercises.

Again from the Push Up Hold position slowly bring one knee to the outside of the elbow, pause for a second and return the leg to the start position.

Next repeat on the other side.

The trick to the exercise is keeping things slow and controlled and ensuring the hips stay as still as possible.


# 14 – Cross Body Mountain Climbers

Cross Body Core Exercises

Similar to the Slow Mountain Climbers only you take the knee across the body to the opposite elbow.

You will really challenge your mobility with this exercise as well as engaging those oblique muscles.

Take your time and ensure you pause when you reach the knee.


# 15 – Up and Down Dog

Taken from the Yoga fraternity this exercise heavily works into the core and back muscles as well as improving mobility.

Start with hands and feet on the floor with hips high, then slowly lower your hips down to the floor using your core to control the movement.

At the bottom your back will be arched as you look up. Slowly push your hips back up to the top and repeat.

Move slow and controlled throughout.


# 16 – Dirty Dogs

Dirty Dogs Core Exercise

Another of my favourites that takes the regular Up and Down Dog exercise to the next level.

Perform the standard Up and Down Dog exercise but when the hips are at the top of the movement take one hand and reach through to touch the opposite toe.

Return the hand back to the floor and then repeat on the other side.


# 17 – Dead Bug

Dead Bug Core Exercise

A great exercise for challenging pelvic stability.

The pelvis is kept in position by your core muscles so the harder the pelvis has to resist movement the harder the core has to work.

Lie on your back with hands and feet in the air.

Maintaining the small of your back on the floor lower your opposite arm and leg to the ground.

Return to the start position and repeat.

If the back cannot maintain constant contact with the ground then the exercise it too difficult.


# 18 – Scissors

Scissors Core Exercise

If you find the Dead Bug too difficult then this is a slightly easier variation.

Lie on your back with feet straight up in the air.

Place your fingertips just underneath your lower back.

Next lower one leg maintaining back pressure on your fingertips.

As soon as you lose that pressure return the foot to the starting position.

Repeat on the other side.


# 19 – Mountain Climber Push Ups

Mountain Climber Push Ups

An advanced version of the Slow Mountain Climber and very challenging for the chest and core muscles.

From the Push Up top position drop down into a regular Push Up but at the same time bring the right knee to the right elbow.

Hold for a second at the bottom and the push back up as you return the leg back to the starting position.

Repeat on the other side.


# 20 – Cross Overs

Cross Overs Core Exercise

Another pelvic stability exercise that really challenges the core muscles.

Lie on your back with just your fingertips in the small of your back.

Raise your feet in the air at 45 degrees and adjust your pelvis so you feel the pressure on your fingers.

Next start slowly crossing one leg over the other.

If you cannot maintain lower back pressure on the tips of your fingers then the exercise is too difficult.


# 21 – Plank to Push Up

Plank to Push Up Core Exercise

This exercise combines the regular Front Plank with the Push Up Hold.

A great exercise for dynamic stabilization of the core and you will feel it in the shoulders and triceps too!

Start in the top position of a Push Up and then place one forearm down onto the floor and then the other, so you are in the Front Plank.

Next just reverse the movement back to the Push Up position again.

Move slowly and place the arms carefully.


# 22 – Cross Body Extension

Cross Body Extension Core Exercise

A more advanced exercise that will have you trembling to stabilize.

Start in the Push Up hold position and then raise opposite arm and leg as high as possible.

Hold for a few seconds and then repeat on the other side.

Most people find one side weaker than the other, if this is the case practice twice as many on that side.

If you want to train your Core the correct way, from the inside out, then see my:

37 Core & Abs Conditioning Workouts


Why Your Hamstrings are Tight and Stretching May Not be the Answer

By Greg Brookes

Why your hamstrings are tight and stretching may not be the answer

You have 3 Hamstring muscles that run up the back of your thighs, the Semimembranosus, Semitendinosus, and Biceps Femoris.

Your hamstring muscles are responsible for knee flexion (pulling your heels to your buttocks) and hip extension (driving your upper leg backwards).

These important muscles also act as a fundamental braking system during locomotion so when you walk down a hill it is your hamstrings that are slowing you down.

Many people nowadays struggle with tight hamstrings.

Why are your Hamstrings Tight?

Before stretching your hamstrings it is important to ask why these muscles get tight in the first place. Like with most things, it is more important to address the cause of the problem rather than the symptoms.

Nothing in the human body works in isolation, everything is connected so when thinking about the hamstring muscles it is worth thinking about the rest of the body too and how the hamstring could relate.

Below I have listed 3 of the main causes of tight Hamstrings:


# 1 – Too Much Sitting Can Cause Tight Hamstrings

If you spend most of your time sitting then the legs remain bent for the majority of time.

When the legs are bent the hamstrings are slackened off. If you remain in this seated position for too long then the body will draw in the slack from the hamstrings.

Later when you come to stand and straighten the legs your hamstrings will feel tighter.

Your body is a master adapter, if you sit down all day your body will adapt to sitting!

Solution:

I think you probably know the answer to this one already.

Spend more time standing up with your legs straightened. Set a timer on your computer and get up and walk around every 50 minutes.

We are not designed to sit down for long periods of time so don’t do it, you will never win!

To help actively lengthen your hamstrings and open up your lower back perform 5 Yoga Squats as often as possible.

Work on getting deeper into the movement as time progresses.

Here’s how to perform the Yoga Squat:

Bodyweight Yoga Squats


# 2 – Tight Quads Can Cause Tight Hamstrings

If the front of your thighs or Quadriceps are tight due to incorrect recruitment of your Buttocks and/or incorrect workout programming, then this can effect your Hamstrings.

Your Quadriceps attach to the bottom of the front of your pelvis, if these muscles are shortened then they will actively rotate your pelvis forwards lengthening the hamstrings.

So although your hamstrings may feel tight they may actually just be long and weak.

If this is the case then you would be better off stretching your Quadriceps and strengthening (not stretching) your Hamstrings.

If you did stretch your Hamstrings then you will make the problem worse because you provide yet more slack for the Quads to reel in.

Solution:

Stretch your Quadriceps more often. Little and often is better then only once now and again.

A very simple Quad stretch that is often performed incorrectly involves taking hold of your one foot, while standing, and pulling your heel to your buttocks.

Once in this stretched position squeeze your buttocks tight and rotate the bottom of your pelvis upwards while keeping the knee pointing downwards.

To encourage your Quad stretches to stick perform a Hamstring strengthening exercise immediately after your stretch.

The bodyweight Single Leg Deadlift below is the perfect exercise to practice after your Quad stretch:

bodyweight single leg deadlift


# 3 – Weak Core Muscles Can Cause Tight Hamstrings

Your pelvis is the muscle attachment site for both the front thigh muscles (quadriceps) and back thigh muscles (hamstrings).

Your Core muscles, including your abs attach to the pelvis too.

When you walk or run your pelvis needs to stay still and in control in order to provide a stable platform for your legs to operate under.

If your pelvis wobbles around, like it does on most sedentary people these days, then you risk injuring your lower back as well as other areas throughout your kinetic chain.

Good core muscles that activate correctly are vital for maintaining pelvic stability.

If your Core and Abs muscles are not doing their job correctly then your Hamstrings will help to stabilise your pelvis.

When the hamstrings are sharing the load with the core muscles they will not only tighten but also reduce their efficiency at what they are primarily designed to do.

Regular Hamstring injuries can be due to weak core and abs muscles!

Solution:

Strengthening and improving your Core muscles and improving their ability to activate correctly will enable your Hamstring to get back to the job they where designed to do.

Just performing hundreds of Crunches or Sit Ups is not the solution here. You need to actively train your pelvis to stabilise during movement.

The Deadbug core exercise below is an excellent way to work on improving your pelvic stability during movement:

dead bug core stability exercise

I show you exactly how to improve your Inner and Outer Core and develop your Pelvic Core Stability in my:

37 Core and Abs Workouts Program


Conclusions

Stretching your Hamstrings may not be the solution for your tight hamstrings.

Like most things in life finding the root cause of the problem is more important than just attacking the symptom.

If you do suffer from tight hamstrings then you may want to consider your lifestyle, quad muscles and core muscles before embarking on a hamstring stretching program.

Related: 10 Things You Didn’t Know About Stretching

Related: 22 Scientific Core Exercises Using No Equipment


Do you suffer with tight hamstrings? Let me know more below…

17 Bodyweight Cardio Exercises Using No Equipment

By Greg Brookes

Bodyweight Cardio Exercises Using No Equipment

If you want to get your heart pumping and increase your lung capacity then cardio based bodyweight exercises are the answer.

The more muscles your can use during an exercise the more demands on energy and the harder the lungs and heart have to work.

The following body weight exercises for cardio require no equipment, they can be performed with your bodyweight only.

Ensure that you have a base level of cardio before performing some of these exercises as the intensity can be very high.

As with all jumping and impact based exercises be careful that you have good joints, ligaments and form before using these exercises.

For maximum results I would recommend an interval style approach to these body weight exercises for cardio so work hard for 20 – 30 seconds and then rest or change exercise.

Here goes…


# 1 – Fast Mountain Climbers

Fast Mountain Climbers

An excellent introduction to bodyweight exercises for cardio.

Tough on the legs as well as the core muscles.

Start in a Push Up position and then alternate jumping one leg forward followed by the other between your hands.

Try to ensure that both feet land at the same time. Work on your timing.

For beginners I will use sliders under the feet to minimalise the impact.


# 2 – Squat Thrust

Squat Thrusts Cardio Exercise

The Squat Thrust takes the Fast Mountain Climber to the next level.

Rather than jumping and alternating legs you keep both legs together.

Ensure you keep both feet together and knees between your elbows as you jump forwards.

As you jump back brace your core muscles and don’t allow your hips to sag.

This bodyweight exercise will challenge your mobility, leg strength, cardio and abs. Again this body weightexercise can be performed with sliders underneath the feet to eliminate the impact for beginners.


# 3 – Jumping Jacks or Star Jumps

Another classic Cardio based bodyweight exercise.

Start in a standing position and jump both feet outwards, at the same time take the arms out sideways too.

Return both feet to the centre and bring the arms down at the same time.

Try to clap your hands together at the top and then at the bottom. Work on your timing!


# 4 – Burpee

Burpee Cardio Exercise

The burpee is very squat heavy exercise so it uses a lot of muscle mass and elevates the heart rate quickly.

From a standing position sit down deep into the squat position and place your hands on the floor.

Next jump both feet back and forwards just like the Squat Thrust.

Finally stand up and push the hips forwards.

Always ensure that you finish standing tall with the buttocks tight.

You can add a jump at the top and push ups at bottom if you wish.


# 5 – Rapid Step Ups

You may remember this one from your school days.

With a bench or step in front of you quickly step up and step down off the bench.

You can overload the one leg by always leading with the same leg or you alternate between sides.

Move as quickly as you can.

You can try 30 seconds of Rapid Step Ups followed by 10 Jump Squats and repeat 3 – 8 times.


# 6 – High Knees

High Knees Cardio Exercise

A powerful bodyweight exercise for cardio that gets the heart rate up fast.

From a standing position sprint on the spot lifting the knees as high as possible.

Use the arms at the same time to really pump the body and get momentum.

You will need to ensure that your calf muscles are nice and warm before performing this exercise.

A great exercise for cardio to partner with the burpee, try 20 seconds of high knees followed by 10 burpees for 3-8 rounds.


# 7 – Buttock Flicks

A simple exercise for cardio that is better for beginners or as a recovery exercise.

From a standing position alternatively flick your legs backward to touch your backside.

If you have tight thighs you will notice a slight stretch during this exercise. A great warm up exercise too!


# 8 – Jump Squats

Jump Squats Cardio Exercise

A serious Plyometric exercise that should only be performed when you can perform perfect regular squats.

Very demanding for the legs and buttocks as well as the heart and lungs.

Perform a regular squat ensuing your thighs go down to at least parallel with the floor.

Next explode from the bottom of the  Squat and into the air.

Try to jump as high as possible pushing the ground away from you.

Land back down with soft knees and immediately drop back into the squat and repeat.


# 9 – Scissor Kicks

A fast bodyweight exercise that may take a little practice.

Start in a standing position and quickly kick one leg out in front of you followed by the other leg.

Continue to bounce from one leg to the other as you kick the legs out in front of you.

One you get into a good rhythm with the movement it works well. Try not to lean back too far.


# 10 – Lump Lunges

Jumping Lunges Cardio Exercise

Slightly more difficult that the Jump Squat and requires more skill and timing.

Perform a regular lunge but as you push up from the ground explode into the air and switch legs so you land with the opposite leg forwards and the other backwards.

Drop straight down into the lunge and repeat.

Always ensure that you drop down into a deep lunge for this exercise for maximum benefits.


# 11 – Tuck Jumps

A very advanced body weight exercise for cardio that will have you breathing heavy in no time.

From a standing position jump up into the air and quickly tuck your knees up to your chest before returning your leg back down ready for landing.

You will need to use your arms for momentum to drive you into the air.

Try performing 10 Tuck Jumps followed by 30 seconds of Fast Mountain Climbers, repeat 3-8 rounds.


# 12 – Side Shuffles

Side Shuffles Cardio Exercise

A great body weight cardio exercise to introduce some sideways or lateral movement into your workout.

From a  standing position shuffle one leg out to the side then quickly replace the leg in the middle with the other leg as you shuffle the other way.

Try to move nice and quickly throughout the exercise and stay on your toes.


# 13 – Skaters with Touch Down

Skaters Cardio Exercise

Very similar in movement to the Side Shuffles except this cardio exercise loads each leg a little more and involves the upper body too.

Shuffle out one leg to the side and then take the other leg behind that leg, at the same time touch the floor with the opposite hand to the side you are moving towards.

Quickly switch sides and repeat in the other direction. When performed correctly you should look like a speed skater, minus the skates of course 🙂


# 14 – Kangaroo

Kangaroos Cardio Exercise

A tough exercise for the legs but worth the effort if you have good movement skills.

Start in a deep squat position with the arms hanging down between the legs and your back straight.

Next explode forwards like a Kangaroo.

Continue to bounce forwards like a Kangaroo gaining as much height between jumps as possible.

It is very important that you keep your chest up and a flat back throughout this exercise.


# 15 – Box Jumps

Great for building leg strength but also for working on your cardio.

Find a solid step or box and practice jumping with both feet up and onto the box.

Use your arms to help drive you up.

Once at the top either jump back down and repeat or step down and repeat.

In order to get the most from this exercise you need to perform the movement quickly and the box needs to be at a challenging height.

Don’t perform this cardio exercise when you are too exhausted or you risk tripping or missing the step or box.


# 16 – Flamingo Burpee

Single Leg Burpee Cardio Exercise

A more advanced body weight cardio exercise that overloads the one leg.

Perform a regular Burpee except this time perform the complete exercise standing only on one leg.

You will need to have good single leg strength for this one as well as strong calf muscles.

If you suffer from calf strains or Achilles Tendon issues then this is not the exercise for you.

Try 10 on one leg and then change sides.


# 17 – Hill Sprints

I couldn’t miss off this excellent exercise and probably one of the best Cardio options.

First perform a good warm up and then sprint for 20 – 30 seconds up a hill.

Next walk back down the hill and repeat. Ensure you have a good cardio base before attempting this exercise and then start with 1-3 Sprints and add 1 extra per week for a maximum of 8 Sprints.

If you can sprint for longer that 30 seconds then you are not running hard enough. Watch your hamstrings and calf muscles during this exercise.

All of these body weight cardio exercises are very demanding so start off slow and build up gradually.


Here are a few body weight workout formats you can try:

Workout 1

  • Exercise 1 – 30 seconds
  • Rest 30 seconds
  • Exercise 2 – 30 seconds
  • Repeat 3 – 8 circuits

Workout 2

  • Exercise 1 – 30 seconds
  • Exercise 2 – 30 seconds
  • Rest 30 seconds and Repeat 3 – 8 times

Workout 3

  • Exercise 1 – 20 reps
  • Exercise 2 – 20 reps
  • Exercise 3 – 20 reps
  • Exercise 4 – 20 reps
  • Repeat for 7 Minutes

Have you tried any of these bodyweight exercises for cardio? Let me know more below:

13 Hip Mobility Exercises to Ease Lower Back Pain

By Greg Brookes

Hip Mobility Exercise to Ease Lower Back Pain

The Hip joint consists of a ball and socket where the top of the thigh meets the pelvis. To be more specific it’s where the femur bone sinks into the Acetabulum socket.

The hips have a huge job to do offering stability for the upper torso and also providing locomotion.

The hips sacrifice mobility for stability unlike the shoulder joint.

Movement is vital for the health of the hips because the act of movement helps:

  1. Regenerate fresh cartilage
  2. Suck the nourishing synovial fluid through the joint
  3. Maintain good end ranges of movement

Ironically it is the lack of movement of the hip joint following disease or injury that leads to their demise. With a limited blood supply to the joint it is the act of movement that produces a pumping effect bringing fresh blood in and flushing it away.

In order to maintain a healthy hip joint the joint needs to be exercised to its full range in all directions. Walking is an excellent exercise to pump nutrients into the hip joints but its limited range is not enough.

If hip joint movements are limited to only activities like walking and sitting then the hip capsules range begins to reduce.

As hip movement gets limited the body begins to compensate in order to maintain optimal performance. The first area that usually gets affected is the lower back.

In short, if the hips can’t produce the desired movements then the lower back will.

Although the lower back (lumbar spine) is designed for slight movement it is not designed to produce compensations for the hips and this is where the problems begin.

So for healthy hips keep moving but also work the joint through its full range to save your lower back.

Here are a collection of effective hip mobility movements for you to practice:


# 1 – Forward Leg Swings

Forward Leg Swings for Hip Mobility

This is a really simple movement that you can practice virtually anywhere.

Stand on one leg, hold onto something if you need help with your balance, and then swing the leg backwards and forwards.

It is the backwards swing that is the most important as this range of movement is the first to go.

Avoid arching your back as you swing the leg backwards and try to keep as straight a leg as possible.

If you stand on a small step, box or platform you will find it even easier to swing your leg through without touching the floor.


# 2 – Side Leg Swings

Side to Side Leg Swings for Hip Mobility

Very similar to the forward leg swings only this time your swing the leg across the body in front of you.

Try to maintain a forward pointing toe position as you swing left and right.

So lead with the heel as you swing across the body.

Again you can hold onto something for balance but it is a great challenge to try without.

If you get the hands moving in the opposite direction it will help.

You will also notice that the ankle on the floor also gets mobilized during each leg swing.


# 3 – Circular Leg Swings

Leg Circles for Hip Mobility

The final one of the leg swing section and this movement takes the joint through a full 360 degrees.

Again standing on one leg rotate the other leg around in circles by the side of your static leg.

You can start with small circles and then build up to larger and larger circles.

If you can perform this exercise without hold on to anything you will also develop stabilizing strength in your standing hip.

Try 60 seconds of circles without putting your foot down and you will see what I mean.


# 4 – Yoga Squats

Bodyweight Yoga Squats

Probably one of my favourite mobility exercises because it not only helps mobilize the hips but also most of the other joints too!

Start off with hands above your head and drop down into a deep squat, keeping your weight on your heels.

If you find it hard to get down nice and deep then turn your feet out slightly and widen your legs.

Once down place your hands down and straighten your legs.

Next sit back down into the deep squat and stand again.

Start performing 10 Yoga Squats every morning and it will change your life!


# 5 – High Step Lunge

This movement not only opens the hips of the one leg but also encourages hip extension with the other.

Remember hip extension is the first range to go so it’s a great movement to practice.

Start facing a chair or high step. Place one foot up onto the chair and carefully kneel down on the floor with the other leg.

Next push your hips forwards and the crown of your head upwards.

Squeeze the buttock of the leg kneeling on the floor.

Try not to arch your back, the movement must come from the hips not the lower back.


# 6 – Deep Lunge

Wow this movement will certainly give your hips a new lease of life.

Starting from a Push Up position take one foot and place it to the outside of your hand.

Next breathe out and sink your hips to the floor.

Hold for 5 seconds and return to the starting position. Repeat on the other side.

The more flexible your hips become the further forward you can place your foot.


# 7 – Cossack

Cossack Bodyweight Exercise for opening the hips

Not just a great dance move but also an excellent hip mobility exercise.

Start with your feet double shoulder width apart with your toes pointing outwards.

Hold onto a chair, table or stability ball in front of you if necessary.

Next drop into a deep lunge on the one side keeping your heels on the floor and keeping the one leg straight.

Hold at the bottom for a few seconds and then repeat on the other side.


# 8 – The Frog

Taking a stretch from the ballet world ‘The Frog’ will really help to open up those hips but it is an aggressive stretch so be careful.

Start on your hands and knees making sure you have a mat or soft surface beneath you.

Next slowly spread your knees apart keeping your feet together.

Take your time, the more mobile your hips the deeper you will be able to drop into the movement.

Certainly not recommended for the beginner but a great stretch for when you are ready.


# 9 – Baby Pose

One of my favourite hip mobility exercises for beginners and excellent for those suffering with lower back pain.

Lie on your back with your feet in the air.

Next reach up and grab the outside of the feet, you can also just grab the knees.

Gently pull one knee towards the armpit followed by the other.

You can work on rhythmical patterns here alternating legs or pulling both at the same time.

As your mobility improves sink your knees deeper and deeper into your armpits.


# 10 – Pigeon Lunge

A slightly more advanced exercise that will help open up a tough hip capsule.

Start in the Push Up position and then take one leg across and underneath your body.

Lay the leg flat so your knee is pointing forwards and underneath your chest.

Next slowly lower yourself onto the knee and support yourself on your forearms.

Take deep breaths and let your hips sink down towards the floor.

For an even more intense stretch reach out your arms in front of you and lay forwards.


# 11 – Figure Four

The Piriformis muscle can literally be a pain in the arse.

This movement not only helps to stretch the Piriformis muscle but also the very strong Gluteal muscles that effect the positioning of the femur in its socket.

Start by lying down on your back with your knees bent and both feet touching a wall.

Next cross one leg over so the ankle rests just above the knee.

Apply gentle pressure to the knee to feel the stretch in your buttock.

The more your legs are bent and you’re closer to the wall the stronger the stretch.


# 12 – Dynamic Hip and Thoracic Spine

Hip Openers Exercise

This is an all encompassing movement that not only opens up your hips but also strengthens the core and opens up the often locked up Thoracic Spine.

Follow the same movement as the #6 Deep Lunge but once the foot has been placed next to the hand take the arm closest to the instep of the forward leg and place the forearm on the floor.

Next take the same arm and reach up and rotate the chest, opening the upper back.

Hold for a few seconds and the repeat, 5 on each side is a good start.


# 13 – Step Overs

A nice easy movement to practice but one that is often performed badly.

From a standing position take the knee out to the side and lift the foot. Next rotate forwards and place the foot down in front of you.

Repeat on the other side.

You should actively be moving forwards looking like you are stepping over something.

Try to lift the foot as high as possible but don’t compensate with the lower back.

Stand tall and focus on movement solely coming from the hips.


Final Conclusion

As with all exercises please start off slowly and progress gradually.

Being able to breathe calmly and deeply is a good sign that you can handle the movement.

Practice these movements little and often for maximum results!


Have you tried any of these exercises? Let me know more below:

  • « Go to Previous Page
  • Go to page 1
  • Go to page 2
  • Go to page 3
  • Go to page 4
  • Interim pages omitted …
  • Go to page 11
  • Go to Next Page »
GB Personal Training Ltd

-

Greg Brookes is the founder of GB Personal Training Ltd and KettlebellsWorkouts.com. He has been featured in Men's Health, Women's Fitness, Men's Fitness, and Health & Fitness Magazine, where he wrote a monthly column. He has also been featured in the majority of UK national newspapers. Labelled as "the trainer to the trainers" he delivers seminars and a regular newsletter to help Personal Trainers improve their skills and achieve better results for their clients. Continue reading

Top Articles

  • 41 Full Body Medicine Ball Exercises
  • 500 Bodyweight Workout Challenge
  • Complete Guide to Kettlebell Training
  • Why Your Hamstrings are Tight
  • Top 13 Functional Training Exercises
  • 17 Bodyweight Cardio Exercises
  • 13 Hip Mobility Exercises to Ease Lower Back
  • 7 Popular Exercises You Must Avoid
  • How to Perform 100 Push Ups
  • 33 Kettlebell Exercises
  • 12 Exercises to Build Better Buttocks
  • 7 Foods That Have More Calcium Than Milk
  • Top 5 Kettlebell Exercises for Interval Training
  • Your Complete Guide to Warming Up

Kettlebell Programs

Kettlebell Programs
  • Workouts
  • About
  • Blog
Kettlebell Workouts | Kettlebell Exercises | Privacy Policy | Terms| Disclaimer

Copyright © 2022 GB Personal Training Ltd . All rights reserved.